


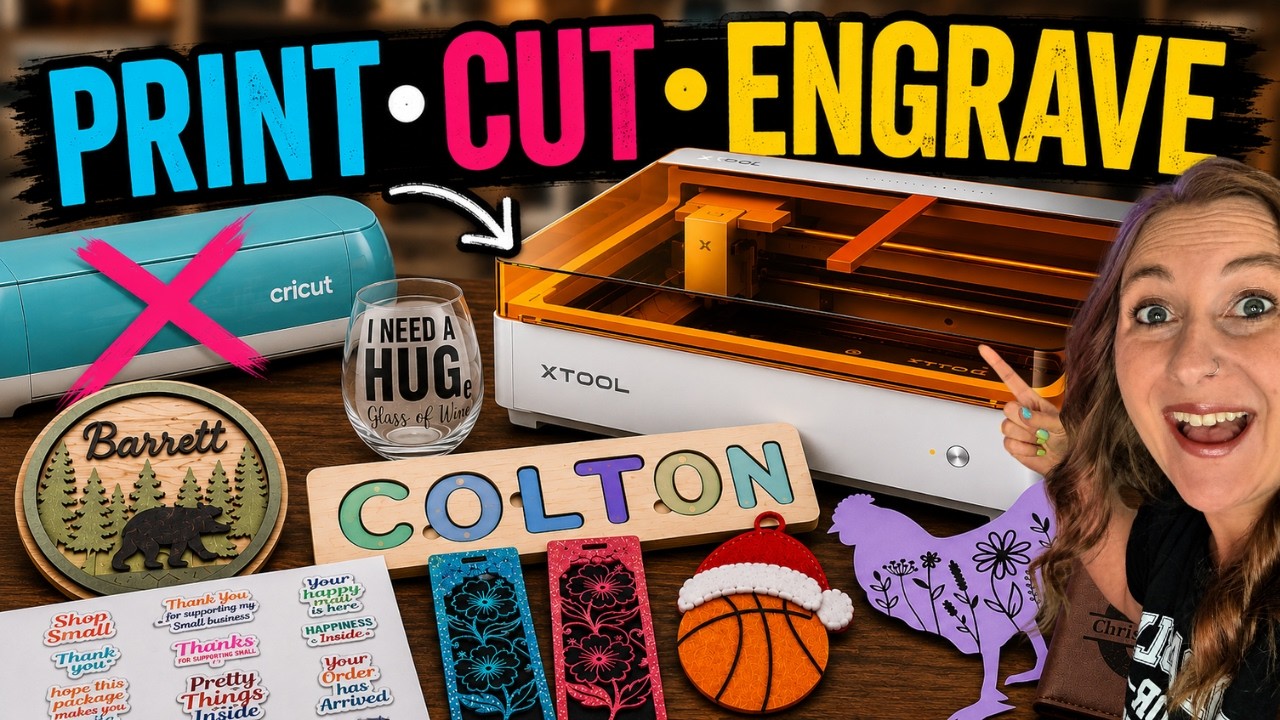
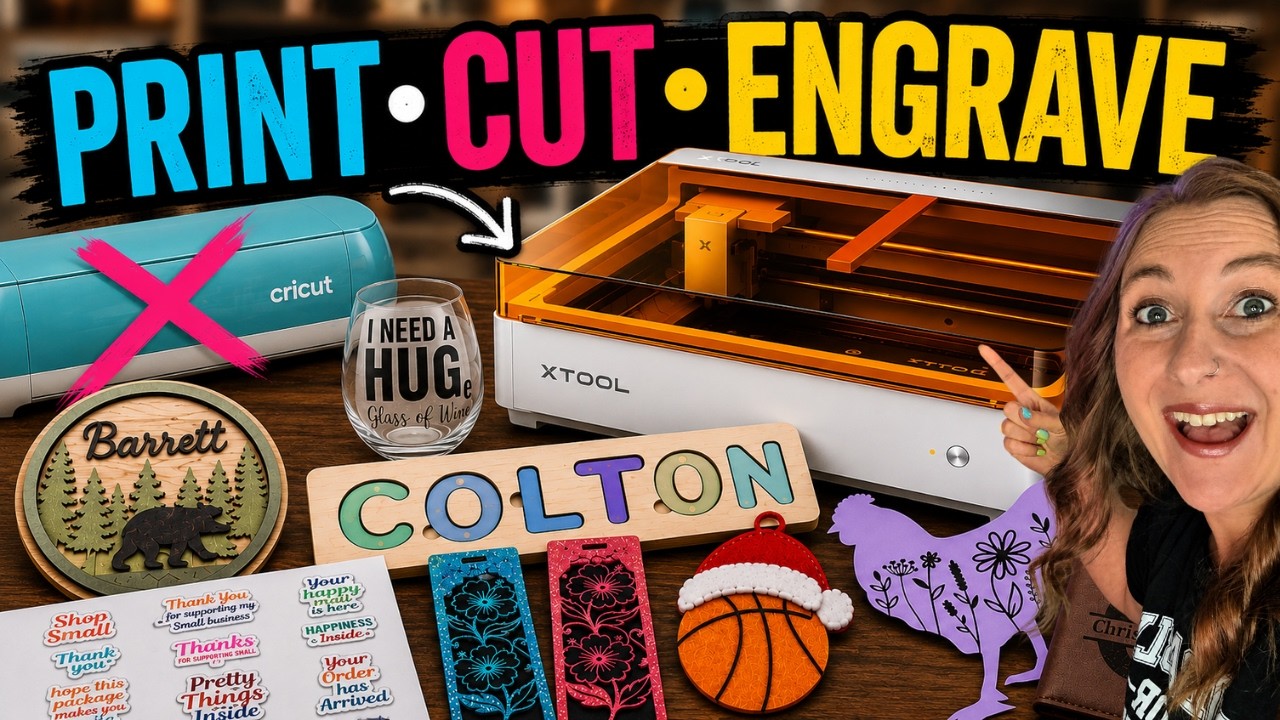
Can one machine really replace your Cricut, your laser engraver, and your inkjet printer? That's exactly what I set out to answer in this xTool M2 review, and here's my short answer up front: for many makers, it genuinely could.
The xTool M2 combines full-color printing with laser cutting and engraving in a single machine. Over the last few weeks, I put it through seven real projects: stickers, glitter cardstock bookmarks, vinyl decals, an HTV shirt, felt ornaments, leather engraving, and a full-color wooden name puzzle.
Here's the honest part. I'm keeping my Cricut for now, and it's not because the M2 can't cut vinyl. It absolutely can. The limiting factor is that laser-safe vinyl is still harder to find and more expensive than regular vinyl. And it won't replace your everyday inkjet printer either.
Watch my full xTool M2 review:
This post contains affiliate links. If you buy through them, I may earn a small commission at no extra cost to you. Full transparency: xTool sent me the M2 for free, but I'm not being paid to review it, and every opinion here is my own.
Quick Links / Table of Contents
- What Is the xTool M2?
- Unboxing & Setup Experience
- 7 Real Projects I Made With It
- What I Love / What Could Be Better
- Who Should Buy the xTool M2 (and Who Shouldn't)
- xTool M2 vs Alternatives
- FAQ
- xTool M2 Review: Final Verdict & Where to Buy
- More Reviews You'll Love
What Is the xTool M2?

The xTool M2 is a hybrid craft machine. One machine, two swappable modules: a full-color printer module and a laser module for cutting and engraving.
It can print a design directly onto wood or sticker paper, then cut that same design out without the material ever leaving the machine.
| Feature | Details |
|---|---|
| Machine type | Full-color printing + laser cutting and engraving in one |
| Module swap | Magnetic modules, swap takes about 5 seconds |
| Positioning | Built-in cameras for placing designs on your material |
| Software | xTool Studio with a material library of recommended settings |
| White ink | None, the material color becomes your background |
| Laser power | 10W (the model I tested; 20W and 3W infrared modules also available) |
| Work area | 16.7″ x 12.6″ with the 10W/20W laser module; 11.8″ x 11.5″ with the inkjet printing module |
| Price | Starts at $599 |
Unboxing & Setup Experience
I've set up a lot of craft machines. I'm the author of Cricut For Dummies, and I teach Cricut, laser engraving, sublimation, and DTF printing on YouTube. The M2 lands firmly in the easy camp.
The magnetic module system is the star. You unplug one cable, lift the printer module off, snap the laser module on, and plug back in. The whole swap takes about 5 seconds. Another laser I own needs screws, cables, and careful reassembly for the same job.
xTool Studio deserves credit too. The material library gives you recommended settings for hundreds of materials, and the built-in cameras make positioning designs incredibly easy. No sticky mats, no guesswork.

7 Real Projects I Made With It
These are the projects I actually make and sell. Here's how all seven went, with links to the full tutorial for each one.
1. Full-Color Wooden Name Puzzle
This project alone sold me on the concept. The M2 printed a full-color alphabet puzzle design directly onto 3mm basswood (grab it here), then I swapped to the laser module and cut every piece out. No painting dozens of tiny layers by hand.
Painting every tiny layer by hand is honestly my least favorite part of layered wood projects, so letting the M2 print the colors on instead felt like magic. The alphabet file I found on Creative Fabrica even has little finger cutouts that make the pieces easy for small hands to grab, and I assigned each layer's color right inside xTool Studio instead of hopping over to another program.
With no white ink, the colors came out softer than on screen, and honestly, that look suits natural wood beautifully. See the full full-color wooden name puzzle tutorial for every step.

2. Print Then Cut Stickers

If you've ever made stickers with a Cricut, you know it takes two machines, registration marks, and a sticky mat. The M2 printed and cut a whole sheet of small business stickers in one machine, perfectly aligned.
The colors came out much more vibrant here than on the wood, since sticker paper has a bright white surface. I also finally used up a stack of old Cricut sticker paper that was always too thick for my inkjet, and because there are no registration marks to work around, I could fit more stickers on a single sheet.
I did notice a slight dark outline around the stickers after cutting, but once I peeled them off the backing, it was barely noticeable. Here's my full guide to making stickers with a laser.
3. Glitter Cardstock Bookmarks

I taped gradient glitter cardstock right to the laser bed, positioned the design with the cameras, and let it cut. The laser sliced through beautifully with no scorch marks, and I immediately made a second one in another color.
I used a gradient glitter paper pad from Michaels, the same style of bookmark I handed out at one of my Barnes & Noble book signings. Once I saw how cleanly the laser cut glitter cardstock, my mind jumped straight to greeting cards, gift tags, and rolled paper flowers.
Get the details in my laser-cut glitter cardstock bookmarks tutorial.
4. Laser-Safe Adhesive Vinyl Decal

Safety note first: never put regular Cricut vinyl in a laser. Most vinyl made for cutting machines contains PVC, which releases toxic fumes when lasered. Only use vinyl labeled laser-safe or PVC-free.
Vinyl is my favorite material to craft with, so this was one of the projects I was most excited to test. I have more than 50 vinyl tutorials on my channel and even dedicated a whole chapter of Cricut For Dummies to it.
Laser-safe adhesive vinyl cuts colored side up, not mirrored. I used the “self adhesive vinyl, glossy black” preset from the material library and made a wine glass decal that weeded nicely. Full walkthrough in my laser cutting adhesive vinyl tutorial.
5. Heat Transfer Vinyl Shirt

HTV works the opposite way: mirror your design and place the material colored side down, with the shiny carrier sheet against the laser bed. I used xTool's laser-safe PU heat transfer vinyl for a floral chicken shirt.
I made this floral chicken shirt for a friend in memory of her favorite hen, Cocoa Bear, so it was a sentimental one. My first test cut sliced right through the carrier sheet and the next came out jagged, but one more tweak found the sweet spot. The busy floral design even hid the couple of tiny pieces that shifted while I was weeding.
It took a few test cuts to dial in the settings, but the finished shirt looked great. My vinyl vs HTV guide explains the difference, and the full laser cutting HTV tutorial has every step.
6. Felt Ornaments

I cut a layered basketball ornament from felt sheets, and most colors cut cleanly on the first try. The white felt was the stubborn one. It only had a 1mm preset while the colored felt had 3mm presets, and it just wouldn't cut through.
My fix? I covered it with painter's tape and ran 2 passes. Done. See the whole project in my laser-cut felt ornaments tutorial.
My son loves basketball, so a layered basketball ornament was an easy pick. What really impressed me is how fast the laser cuts intricate felt shapes, so if you sew or make appliqués, it could save you a ton of prep time.
7. Leather Engraving: Genuine vs. Fake

This one turned into a lesson about cheap blanks. A Temu “leather-wrapped” flask engraved terribly. The laser burned through the brown surface and exposed a rough gray, grainy layer underneath. A genuine leather wallet engraved dark, clean, and crisp.
The flask barely engraved at first, so I added an offset and ran it again and again, and the M2 landed in the exact same spot every single pass. I don't think the sad result was the laser's fault, though; that “leather-wrapped” Temu flask was probably some kind of coated plastic that never should have gone in a laser. It was a good reminder to test cheap blanks before you ever list them for sale.
Bonus: the M2 re-aligned perfectly across multiple engraving passes, landing in the exact same spot every time. Read the full comparison in laser engraving genuine vs fake leather.
What I Love / What Could Be Better
What I love:
- The magnetic module swap. About 5 seconds to switch between printing and laser cutting.
- The built-in cameras. Positioning designs is fast and accurate, with no sticky mats to fight.
- Print then cut in one machine. The material never moves, so there are no registration marks and no alignment worries.
- xTool Studio. Assigning colors to laser file layers took clicks instead of a trip to another program.
- Repeatable alignment. Re-running an engraving pass lands in the exact same spot, which can save a project that engraved too light.
What could be better:
- No white ink. Colors print softer on wood and other non-white materials.
- Laser-safe vinyl availability. xTool sells fun finishes like glitter, glow-in-the-dark, puff, and chameleon, but many were out of stock while I was testing, and laser-safe vinyl costs more than regular vinyl.
- A little dialing in required. My sticker sheets had a faint dark outline, and the HTV took a few test cuts to find the sweet spot.
Who Should Buy the xTool M2 (and Who Shouldn't)
Buy the M2 if:
- You make layered wood projects and are tired of hand-painting every piece
- You sell stickers and want to skip the two-machine print then cut dance
- You want one machine that handles wood, paper, felt, leather, and laser-safe vinyl
- You've been eyeing both a Cricut and a laser and only have room or budget for one machine
Skip it (or keep your Cricut too) if:
- Adhesive vinyl and HTV are the majority of what you make. Laser-safe vinyl still comes in fewer colors and finishes at higher prices, so heavy vinyl crafters should keep the Cricut for now.
- You want it to replace your everyday printer. Could I print my daughter's book report on it? Technically yes. Would I tape copy paper to a laser bed every time? No.
xTool M2 vs Alternatives
xTool M2 vs Cricut + inkjet printer: The Cricut combo wins on vinyl selection and everyday paper printing. The M2 wins on printing directly on wood, cutting felt and leather, engraving, and one-machine sticker making.
xTool M2 vs xTool M1 Ultra: I've also reviewed the xTool M1 Ultra, which pairs a laser with a blade cutter. The M2's headline feature is full-color printing plus laser in one machine.
xTool M2 vs a standalone laser: A dedicated laser can't print color. If you only want engraving and cutting, check my guide to the best laser engraver for beginners first.
FAQ
Is the xTool M2 worth it?
If you make wood projects, stickers, ornaments, or engraved gifts, it's one of the most versatile craft machines I've ever used. If vinyl is most of your business, keep your Cricut alongside it for now.
Can the xTool M2 replace a Cricut?
For many makers, yes. It cuts adhesive vinyl and HTV just fine. The catch is that laser-safe vinyl comes in fewer colors and finishes and costs more than regular vinyl.
Can you cut regular Cricut vinyl with a laser?
No. Most regular adhesive vinyl and HTV contains PVC, which releases harmful fumes when lasered. Only use vinyl labeled laser-safe or PVC-free.
Does the xTool M2 print white ink?
No. Your material's color becomes the background of your design. Colors pop on white sticker paper and look softer on wood.
What materials can the xTool M2 work with?
In my testing it printed on and cut basswood and sticker paper, laser cut glitter cardstock, laser-safe adhesive vinyl, laser-safe HTV, and felt, and engraved genuine leather.
xTool M2 Review: Final Verdict & Where to Buy

After seven projects, here's where I landed. The xTool M2 could genuinely replace a Cricut, a laser, and a printer for many makers. What won me over was all the little things: the cameras, the 5-second module swaps, and never fighting with a cutting mat.
I'm keeping my Cricut for now because laser-safe vinyl availability and cost is still the limiting factor, not the machine. And it won't replace my everyday inkjet. But I'm kind of obsessed with it, and I'm already planning full-color holiday ornaments I won't have to paint.
Hear my full verdict here:
Ready to check it out? Here's my link: xTool M2 Laser
Use code KERRI116 at checkout to see if additional savings apply to your order.
For designs, Creative Fabrica is my go-to for fonts, SVGs, and laser files, including the alphabet puzzle and small business sticker bundle from this review.
More Reviews You'll Love
- Laser vs Cricut for Stickers
- What Is Laser-Safe Vinyl?
- Why You Should Test Blanks Before Selling
- How to Make Leather Patch Hats with the xTool M1
Now it's your turn! If you pick up an M2, I'd love to hear what you make first. Come share your projects and questions in my Kerri Crafts It Facebook Group. See you there!


