
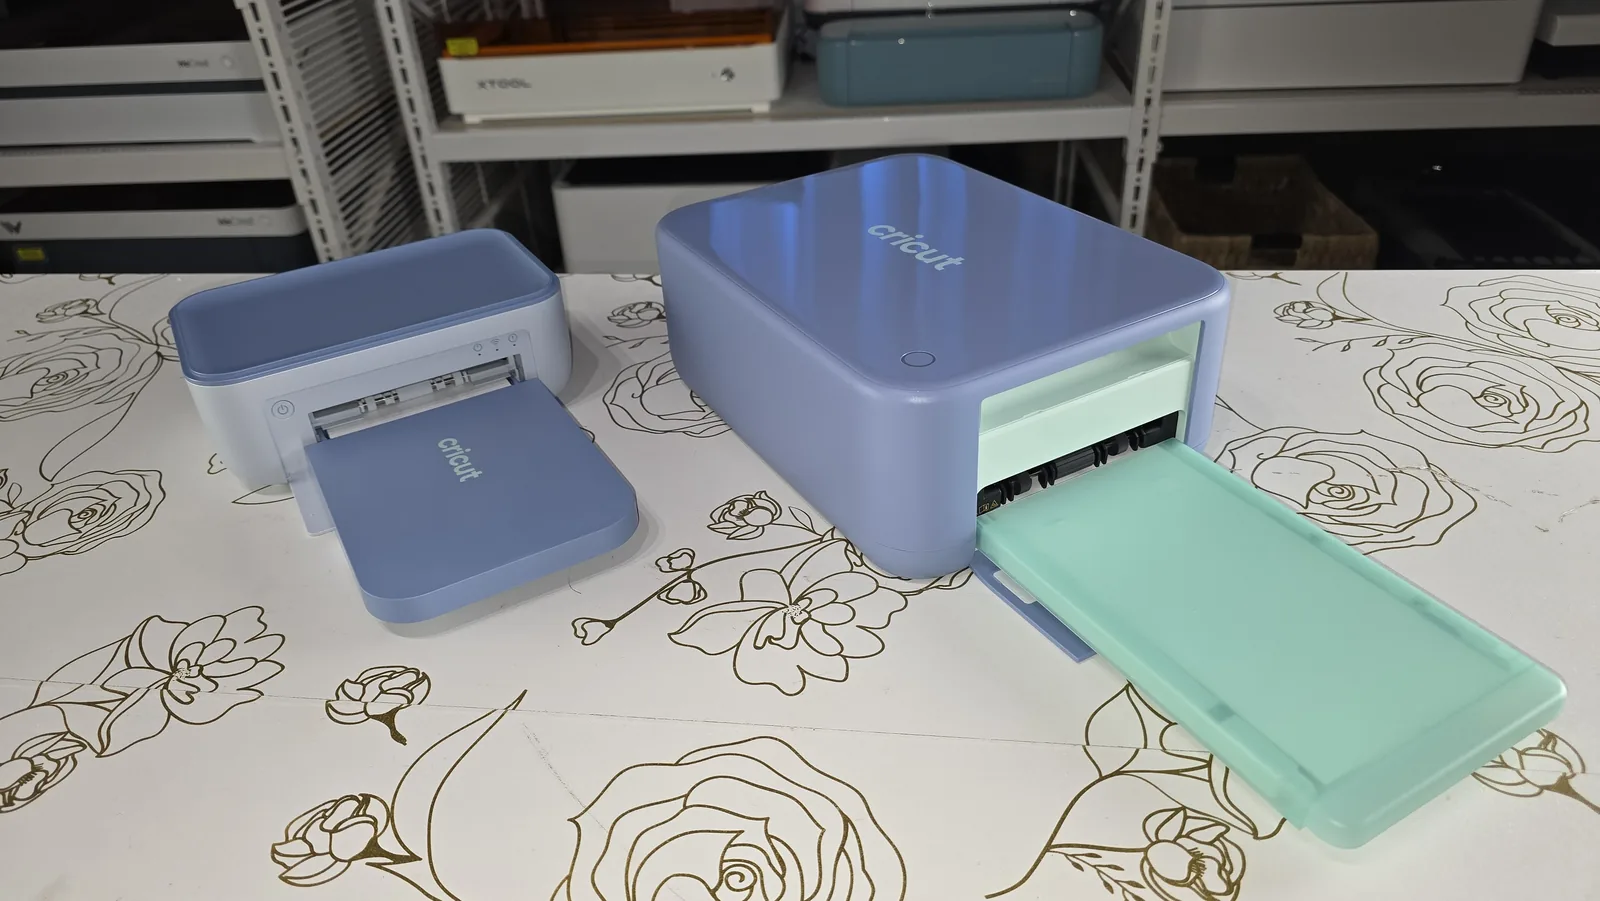
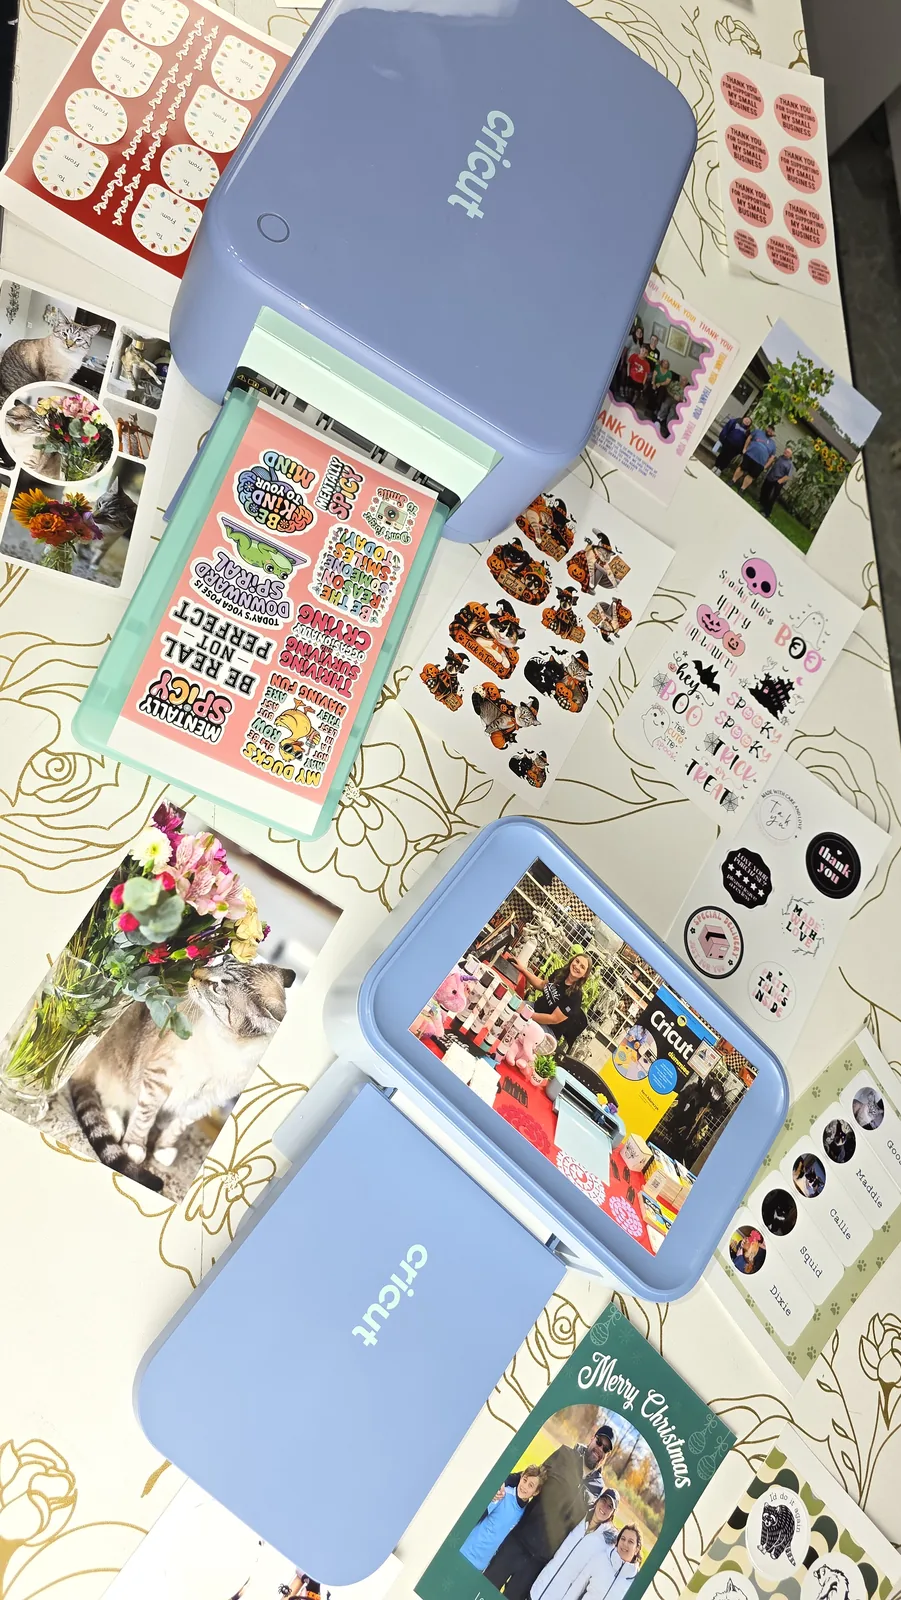
Oh my gosh, they finally did it! Cricut just launched two brand new machines, the Cricut StickerPix Print and the Cricut StickerPix Print + Cut, and I've spent the last few days testing both of them.
The Print + Cut is a printer and a cutting machine in one little box. It prints, laminates and cuts your stickers without a separate printer and without a cutting mat. That's exactly what I was begging Cricut to make back in March when I reviewed the Cricut Explore 5.
So here's my honest answer up front. If you want stickers in any shape you like, the $299 StickerPix Print + Cut is the one I'd buy. If you mostly want photos, cards, labels and simple pre-cut stickers, the $169 StickerPix Print does the same printing and laminating without the cutter. Neither one replaces your Cricut cutting machine or your regular printer, and that's not what they're for.
This post contains affiliate links. If you buy through them, I may earn a small commission at no extra cost to you.
Cricut sent me both machines for free to test. They didn't pay me for this review, and every opinion here is my own. You know me, I always share the good, the bad and the ugly.
 18:35
18:35
Watch the full tutorial
Cricut Made a STICKER MACHINE?! Cricut StickerPix Review
Cricut just launched the NEW Cricut StickerPix Print and StickerPix Print + Cut, and I tested BOTH! 🤯 The StickerPix Print + Cut can print, laminate AND cut custom stickers all in one machine — no separate printer, cutting mat, or manually applying laminate.
Key Takeaways
- The Cricut StickerPix Print + Cut costs $299 and the StickerPix Print costs $169. The extra $130 buys you a built-in cutter that cuts around custom sticker shapes.
- StickerPix prints with thermal dye-sublimation, not inkjet ink. A ribbon of yellow, magenta and cyan dye is heated onto specially coated paper, so you can only use StickerPix materials.
- Every print uses a full panel of ribbon, whether you fill the sheet or print one tiny sticker. Always fill the whole 4×7 inch sticker sheet to get your money's worth.
- StickerPix laminates every print automatically on a fourth pass. There's no sheet of laminate film to apply by hand, and Cricut rates the finish as water-resistant, not waterproof.
- Refills work out to roughly 50 to 70 cents per sheet, including paper, dye and laminate. A 72-print photo bundle is $37.99, or about 53 cents per 4×6 photo.
Quick Links
- Key Takeaways
- StickerPix Print vs Print + Cut: What's the Difference?
- What's in the Box
- Setting Up the StickerPix Print + Cut
- How StickerPix Works: Thermal Dye-Sublimation
- Making Halloween Pet Stickers With the Print + Cut
- Testing the $169 StickerPix Print
- Printing 4×6 Photos
- How Much Do StickerPix Refills Cost?
- What I Love
- What Could Be Better
- Who Should Buy a StickerPix (and Who Shouldn't)
- StickerPix vs Other Ways to Make Stickers
- FAQ
- Final Verdict: Which StickerPix Would I Buy?
StickerPix Print vs Print + Cut: What's the Difference?
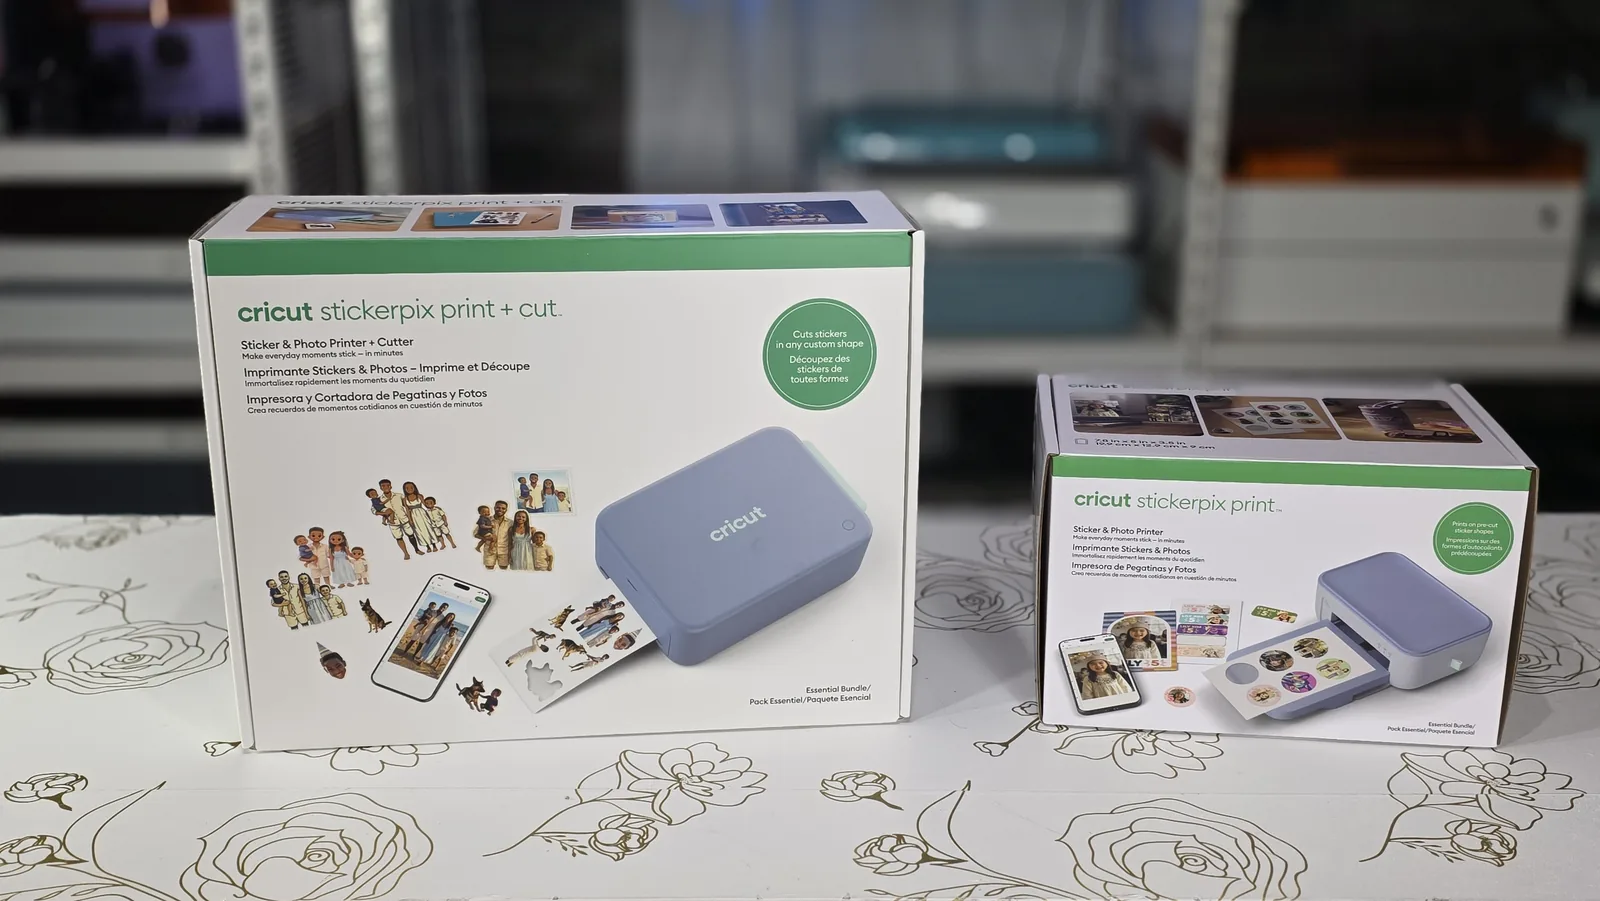
Both machines print full-color stickers, photos, cards, invitations and labels. They both use the same thermal dye-sublimation printing process, and they both laminate your prints automatically.
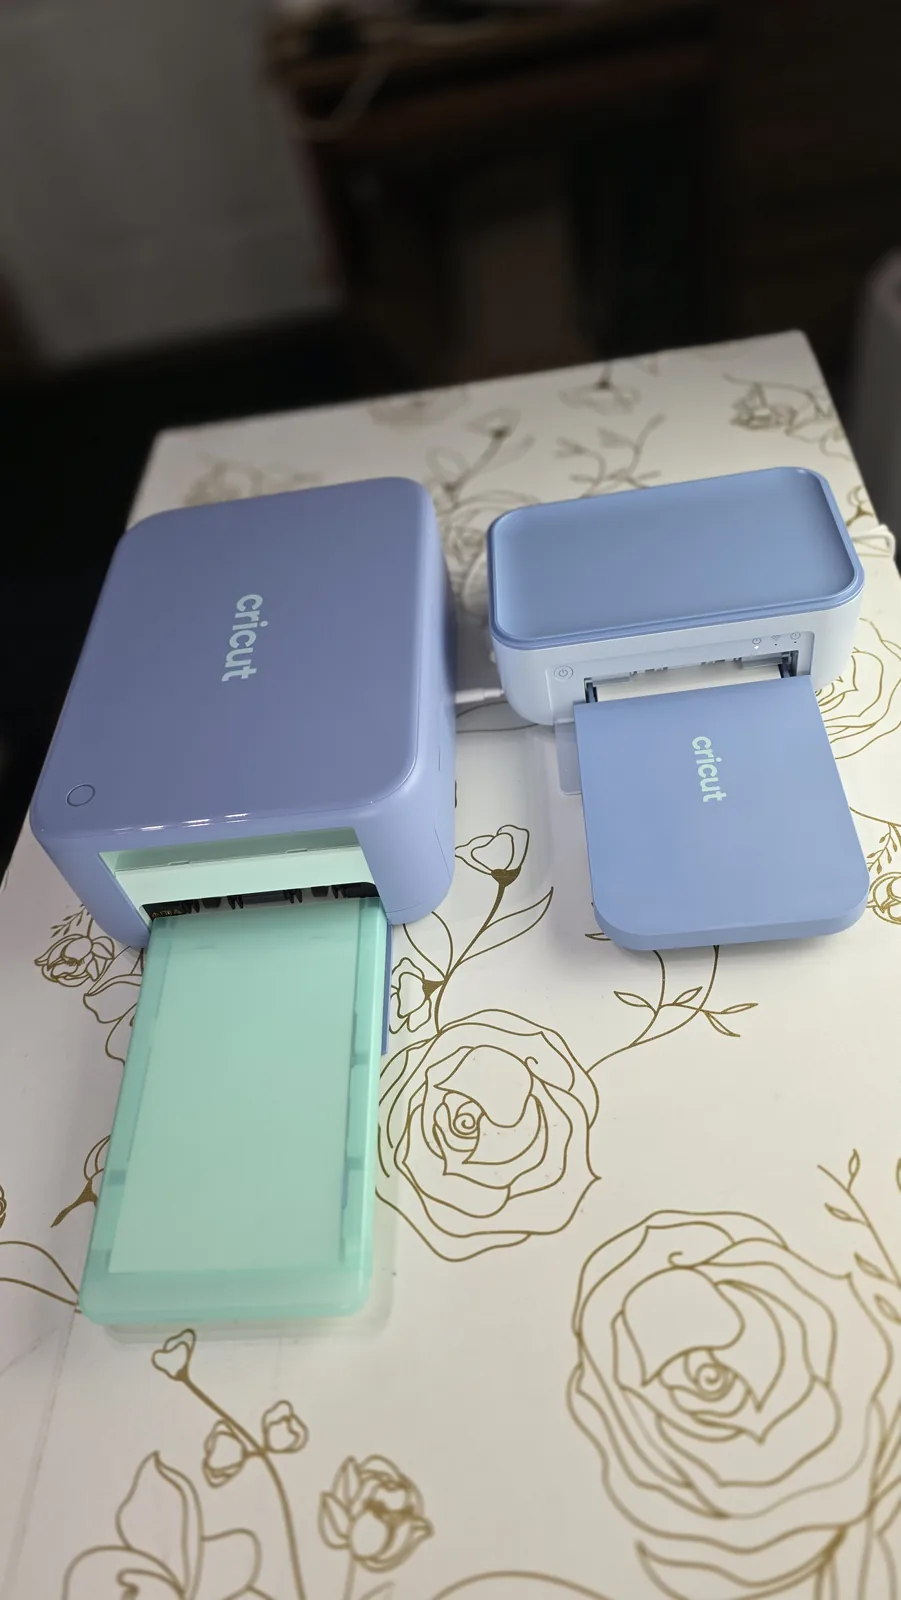
The big difference is the cutter. The StickerPix Print uses sticker sheets that are already pre-cut into shapes. The StickerPix Print + Cut has a blade built right in, so it can cut around any custom shape you design.
| Feature | StickerPix Print | StickerPix Print + Cut |
|---|---|---|
| Price | $169 | $299 |
| Printing | Thermal dye-sublimation | Thermal dye-sublimation |
| Laminating | Automatic | Automatic |
| Cutting | None, pre-cut sheets | Built-in, custom shapes |
| Sticker sheet | Pre-cut circles and rectangles | 4×7 in white glossy |
| Photo paper | 4×6 in | 4×6 in |
| Prints in the box | 54 | 36 |
| Refill sets | $27.99 to $32.99 | $24.99 to $47.99 |
| Cutting mat | Not needed | Not needed |
| Shop | Essential Bundle | Essential Bundle |
So you're basically paying an extra $130 for that built-in cutter. Since that's the one I was most excited about, let's start there.
What's in the Box
Here's everything that comes with the StickerPix Print + Cut:
- A paper with a QR code to install Cricut Design Space on your phone
- An instruction manual
- A power adapter
- The machine itself (I love the soft blue and mint colors they chose)
- The ink cartridge
- 18 sheets of 4×7 inch white glossy sticker paper
- 18 sheets of 4×6 inch white glossy photo paper
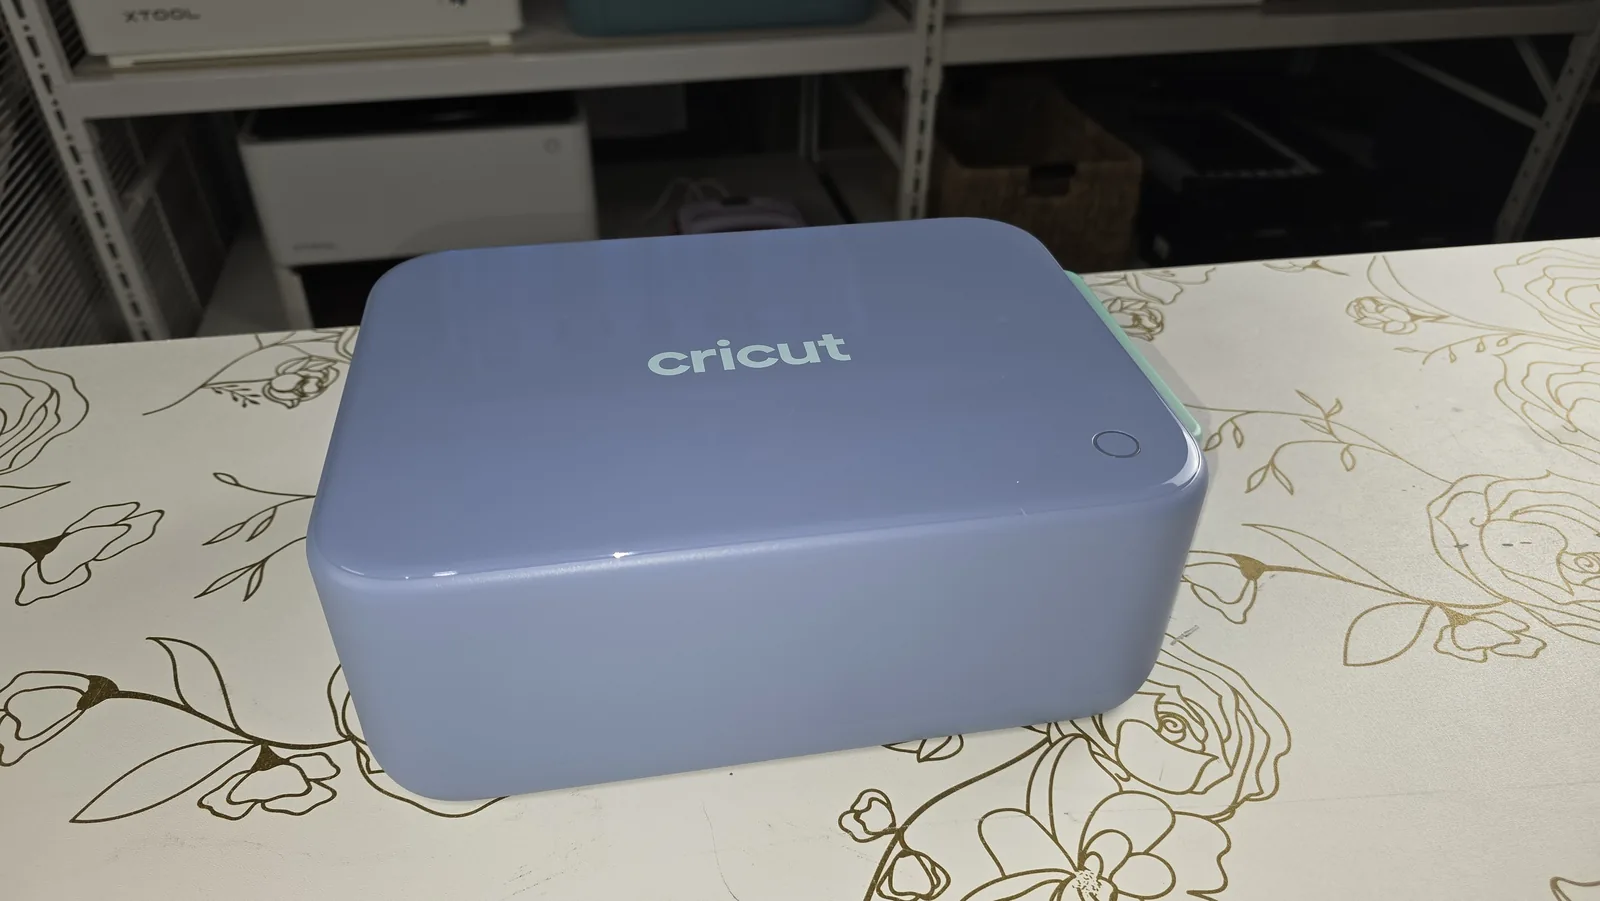
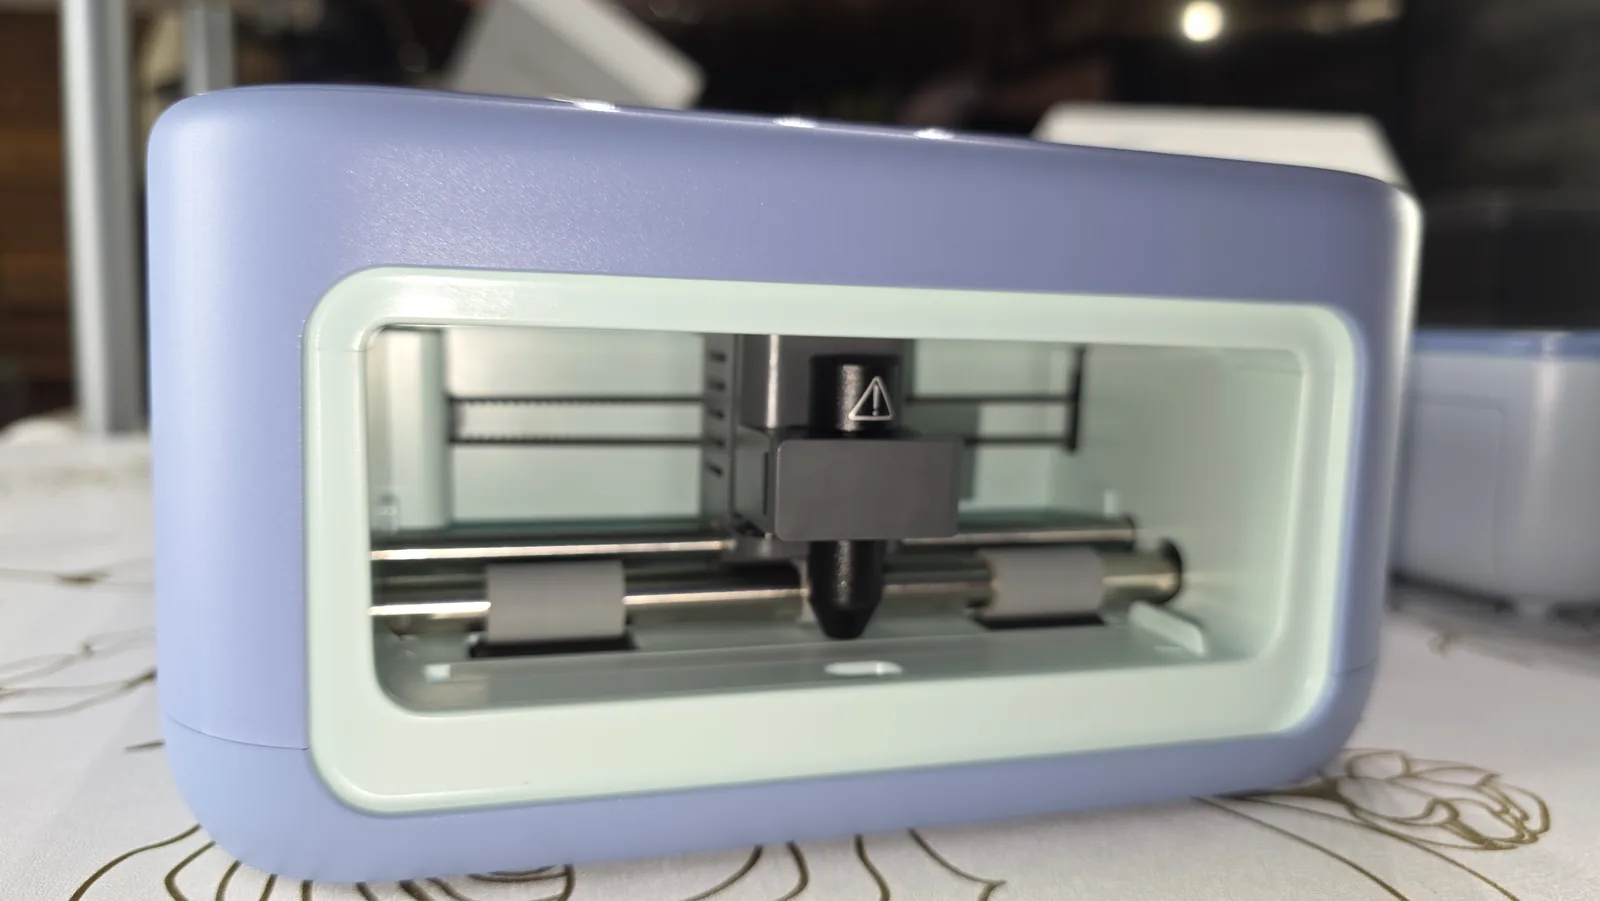
When you take the plastic off, there's a little door on the bottom. Mine fell off the first time I picked it up, but it snaps right back on. Turn the machine on its side and you'll find a small tab. Pull it out and the door pops off so you can remove the packing material.
Inside is the cutting blade that cuts out your custom sticker shapes. The door pops back on easily if you want to keep the machine closed up when you're not using it.
Setting Up the StickerPix Print + Cut
Setup is really simple, and it only takes a few minutes.
- Install the cartridge. Spin the machine around to the back and open the little door. Take the cartridge out of its plastic and turn it until it fits. It only goes in one way, with the QR code facing the top left. Slide it in and close the door.
- Pull out the paper tray. On the side of the machine, pull the teal piece all the way out. Then lift the top piece to open it up. This is what holds your materials.
- Set the lever for your paper. On the left side of the tray there's a small lever. For sticker paper, swing it down flat against the side. For 4×6 photo paper, leave it sprung open.
- Load your paper printed side up. Hold the sheets by the edges and don't touch the front. Fingerprints on the surface can show up in your finished print.
- Slide the tray back in. It goes into the bottom of the machine on the same side you pulled it from, not the blade side.
- Plug it in and power it on. The power cord goes in the back, and the power button is on top.
- Scan the QR code. Follow the instructions and it takes you into Cricut Design Space. You can use your phone or your computer. I did everything from my phone.
Connecting it in Design Space
Once you've scanned the QR code and signed in, here's how to add the machine:
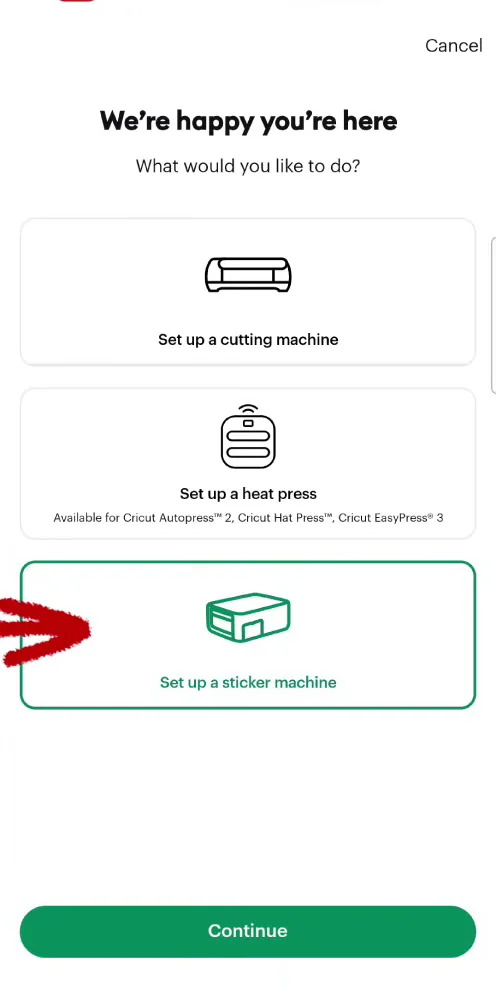
- Tap the three lines in the upper left corner and choose Machine Setup.
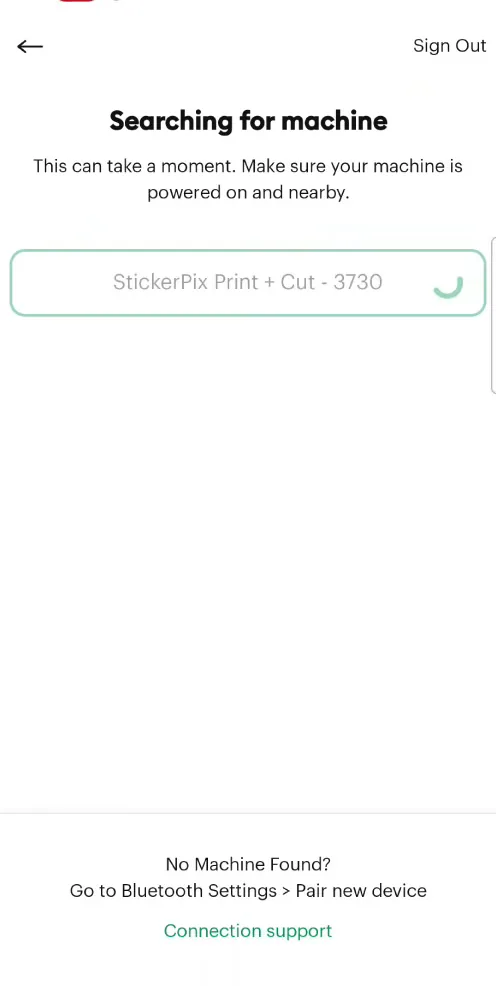
- Tap Set up a sticker machine at the bottom, then pick which StickerPix you have.
- Design Space walks you through unboxing and installing it. Connect over Bluetooth, so make sure Bluetooth is on on your phone, then tap Pair.
- Agree to the terms and tap Activate. It updates the firmware and gets the machine ready.
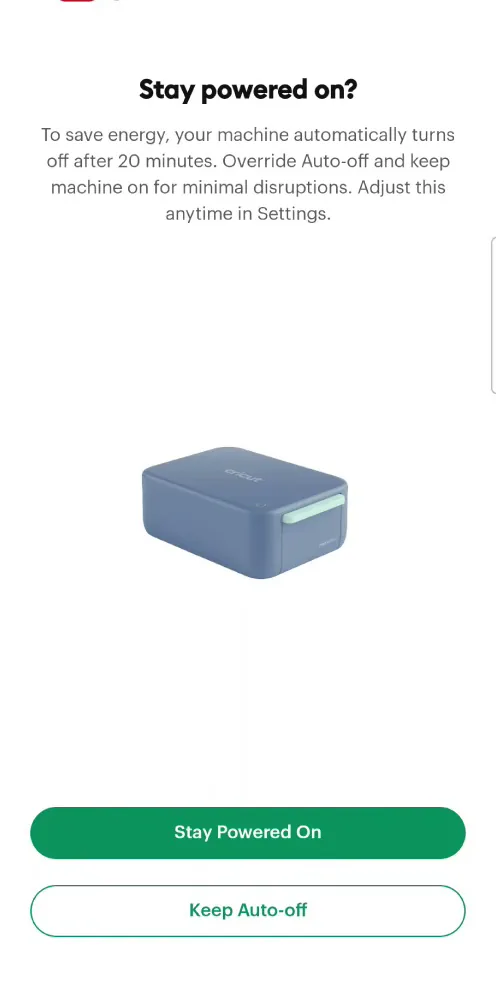
- Choose whether to keep auto off. To save energy, the machine turns itself off after 20 minutes. You can override that, but I kept it on because I'm pretty good at forgetting things.
Tip: Leave some space behind the machine. The paper moves in and out of the back while it prints, so don't push it right up against a wall.
If you're new to Design Space, my beginner's guide to Cricut Design Space walks you through the basics.
How StickerPix Works: Thermal Dye-Sublimation
If you've ever made stickers with a regular inkjet printer, you've probably noticed this looks completely different. There's no liquid ink, and this isn't regular printable sticker paper.
That's because StickerPix uses thermal dye-sublimation. When I first read that, I was like, wait, what? Sublimation? Like what I use for shirts, mugs and keychains?
Well, kind of. With regular sublimation, you print sublimation ink onto transfer paper and then press it with a heat press. StickerPix does the whole thing inside the machine.
- The cartridge holds a ribbon with yellow, magenta and cyan dye.
- The machine heats those colors directly onto specially coated paper.
- So the heat press part is basically happening inside the printer.
Because of that special coating, you can't use the printable vinyl or sticker paper you already have. You have to use StickerPix materials.
The one thing you need to know about the cartridge
Every time you make a print, the machine uses one complete set of yellow, magenta, cyan and the clear laminate layer. Whether you fill the whole sticker sheet or print one tiny sticker in the middle, you use the same amount of ribbon.
So if you're making stickers, fill the sheet.
You also don't buy the ink and paper separately like you would with a normal printer. They're sold together as a set, and the number of sheets matches the number of prints in the cartridge. A 36-print set comes with 36 sheets, a 54-print set comes with 54 sheets, and so on.
Making Halloween Pet Stickers With the Print + Cut
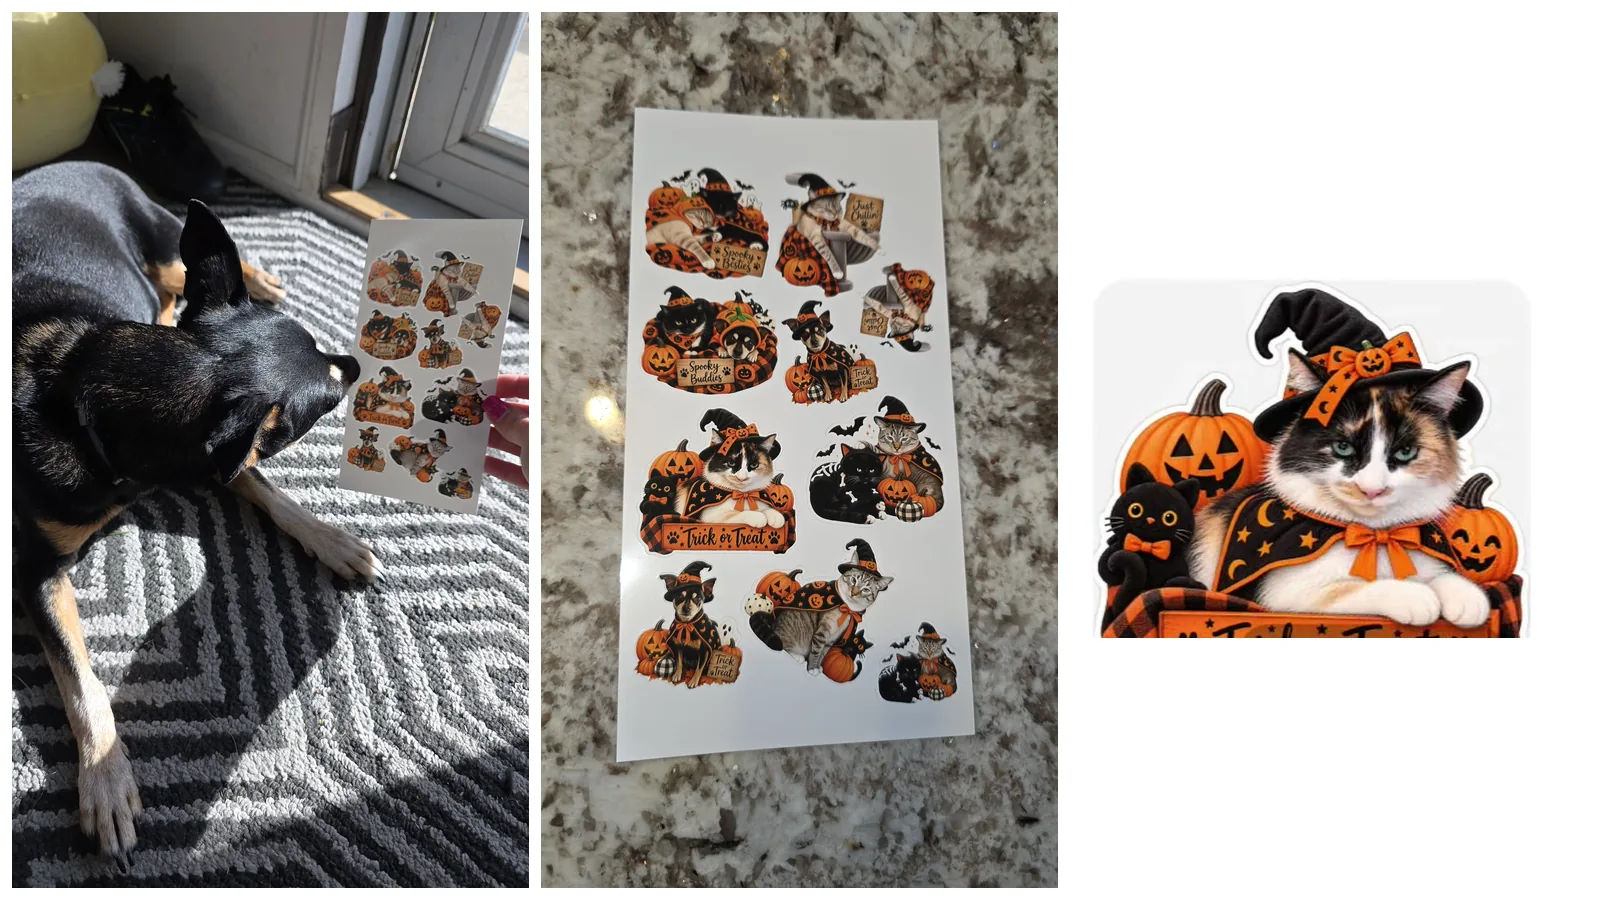
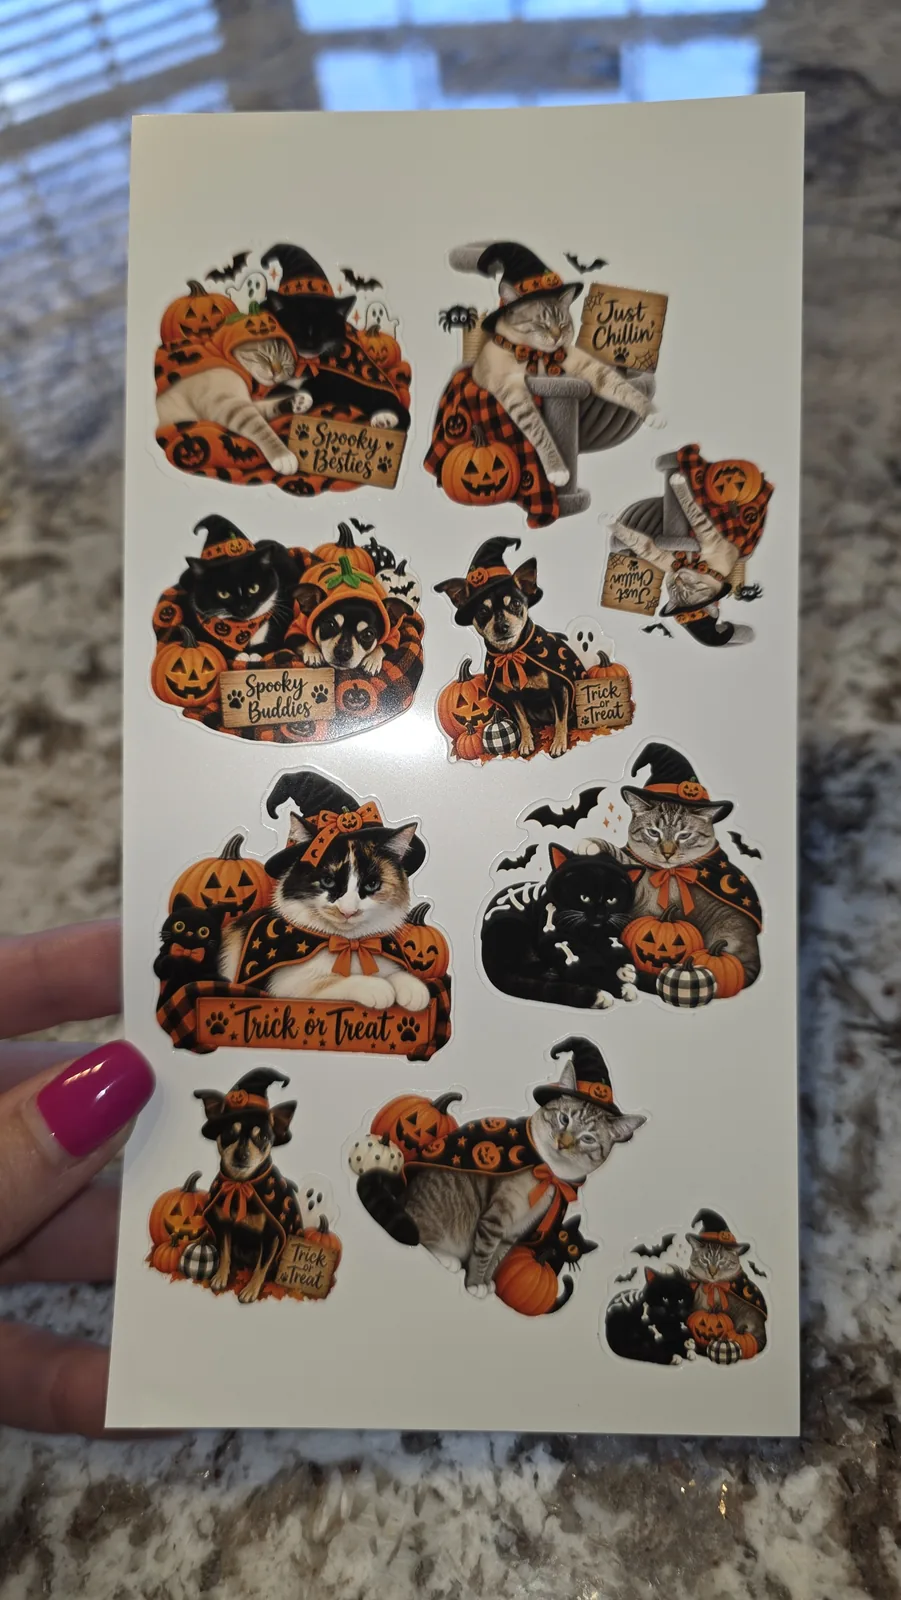
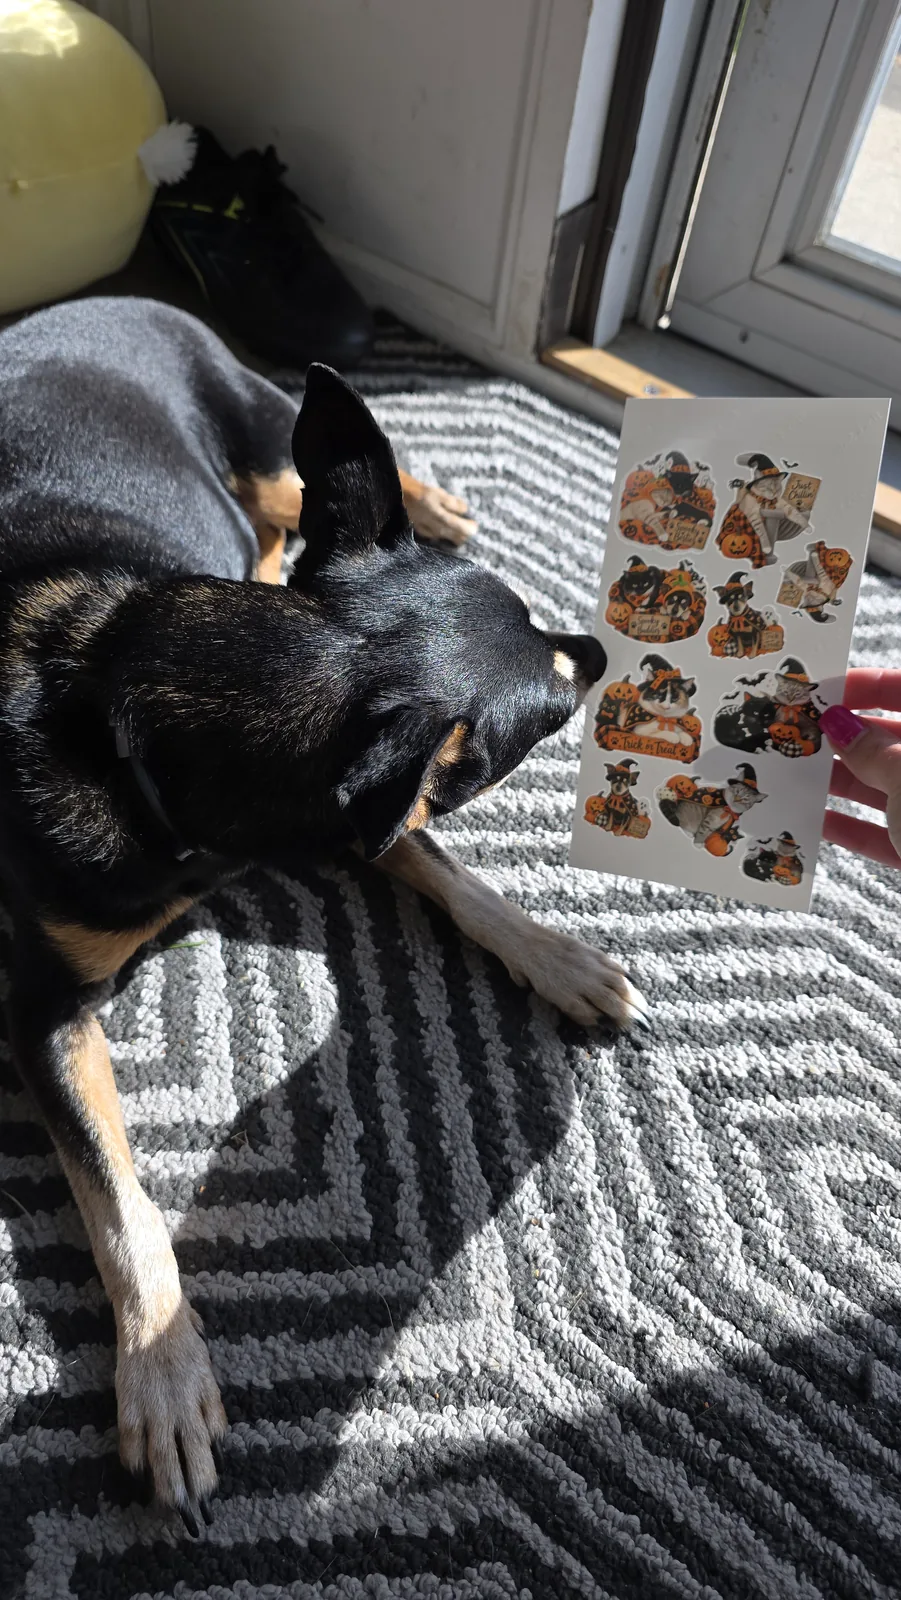
For my first project, I obviously had to make stickers. I uploaded pictures of my cats and my dog to ChatGPT and asked it to turn them into Halloween stickers. Look how freaking amazing these came out! I wrote up the whole process, prompts included, in my guide to turning your pet photos into stickers.
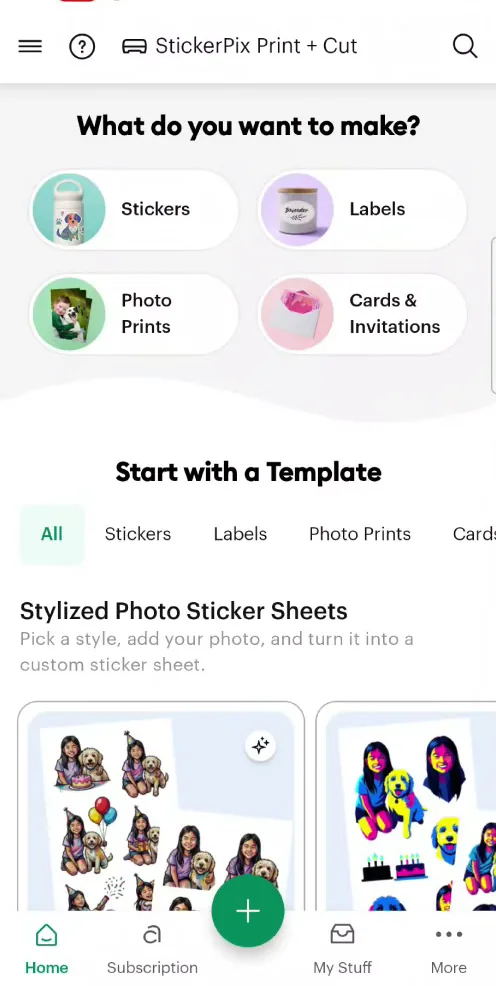
Then I brought them into Design Space and fit as many as I could onto one 4×7 sticker sheet. Design Space has templates you can drop photos into, but I just added my own pictures:
- Tap Upload, then Select from photo library. You can only upload one image at a time, so pick one and tap Done.
- Tap Border to adjust the offset around your design. I made mine much smaller. Tap the check mark when you like it. That same panel has a Sticker toggle, and turning it off prints your design without cutting it.
- Drag a corner in or out to resize it. I made mine about 1.45 inches.
- Repeat for each sticker. There's also an eraser tool if you need to clean up a little piece you don't want, which I used on one of mine.
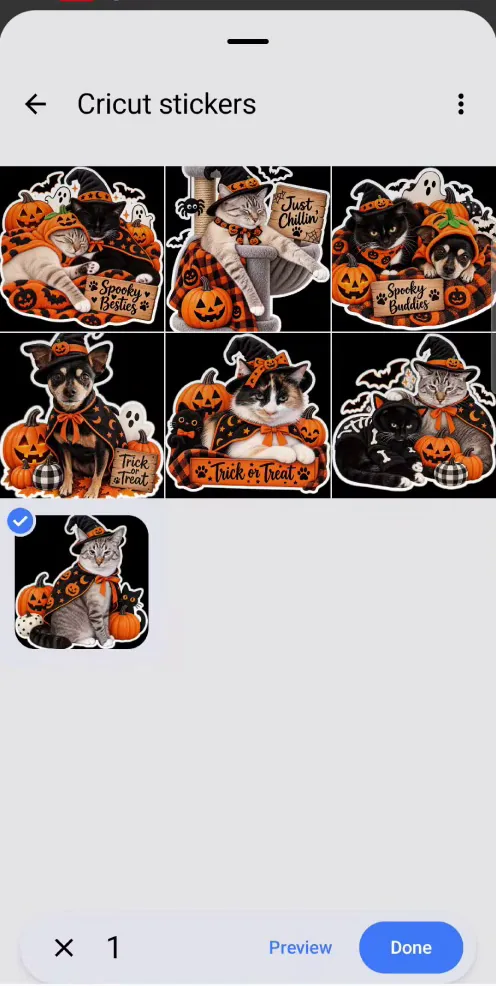
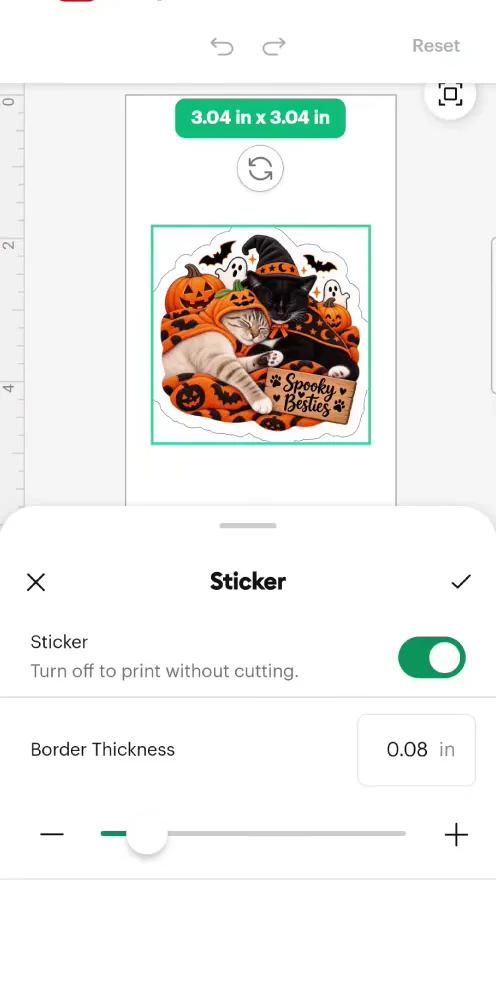
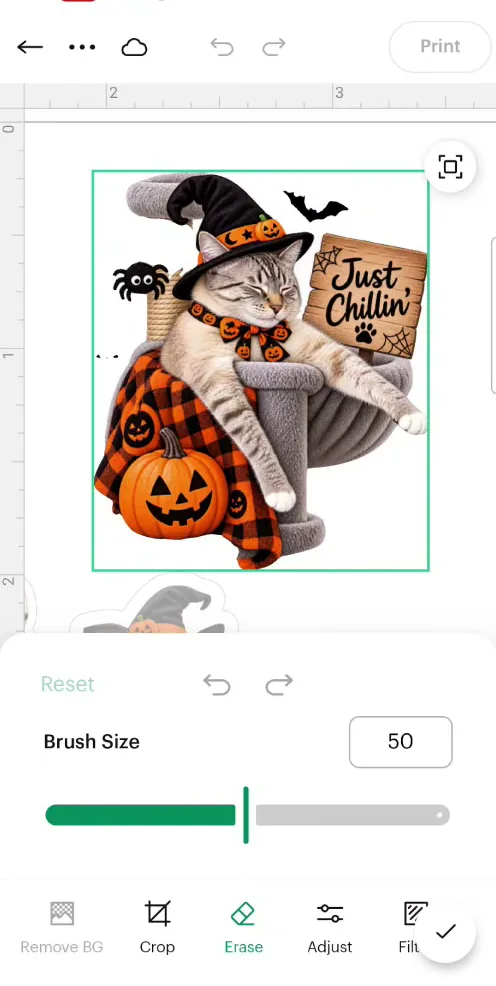
One thing I noticed right away is that there aren't a lot of settings to mess with. Once I picked what I was making, I didn't have to choose a material setting or tell it what size paper I was using. Design Space already knew. I just hit Make.
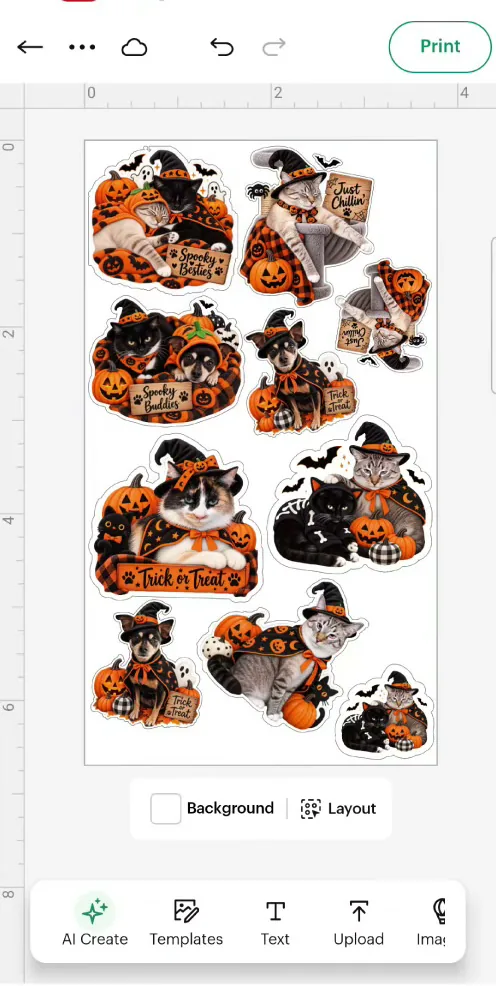
Watching it print
This is the fun part, because you can actually watch the dye-sublimation happen. The sheet moves back and forth through the machine and builds the image one color at a time. First yellow, then magenta, and once it adds cyan you have your full-color image.
Automatic laminate
Here's the part I REALLY like. It laminates them for you.
If you've ever made waterproof stickers with a Cricut, you know what a pain laminate film can be. It's like trying to perfectly apply a giant sheet of super thin Scotch tape. It's sticky, it's hard to handle, and it's really easy to end up with wrinkles, bubbles, or a piece stuck to itself.
On the fourth and final pass, StickerPix applies a clear protective layer over the print for you. Cricut says that layer makes the finished stickers water-resistant, scratch-resistant and more resistant to fading.
Just keep in mind that water-resistant isn't the same thing as waterproof or dishwasher-safe. I wouldn't put one on a tumbler and run it through the dishwasher over and over. For things that might get splashed or handled a lot, though, the laminate is a real step up from an unlaminated sticker.
The cut
Once it's done printing and laminating, the Print + Cut moves the sheet right into the built-in cutter. I didn't have to add registration marks or stick anything onto a cutting mat. It does the cutting for me too.
Cricut says these print at 300 DPI, which is pretty standard for this type of dye-sublimation photo printer. But honestly, the number matters a lot less to me than what the print actually looks like.
And that's it. We went from pictures of my pets on my phone, to Halloween sticker designs, to printed, laminated, custom-cut stickers. That's exactly what I asked for back in March.
Want to fill a sheet right away? My free Halloween sticker designs are transparent PNGs, so they work on the StickerPix too.
Testing the $169 StickerPix Print
But do you actually need to spend $299? Let's look at the StickerPix Print.
This one doesn't have a cutter, so it uses sticker sheets that are already pre-cut. Inside the box you get:
- 18 sheets of pre-cut 1.5 inch circle stickers
- 18 sheets of pre-cut rectangle stickers
- 18 sheets of 4×6 photo paper
That's 54 sheets altogether, and the cartridge is good for exactly 54 prints.
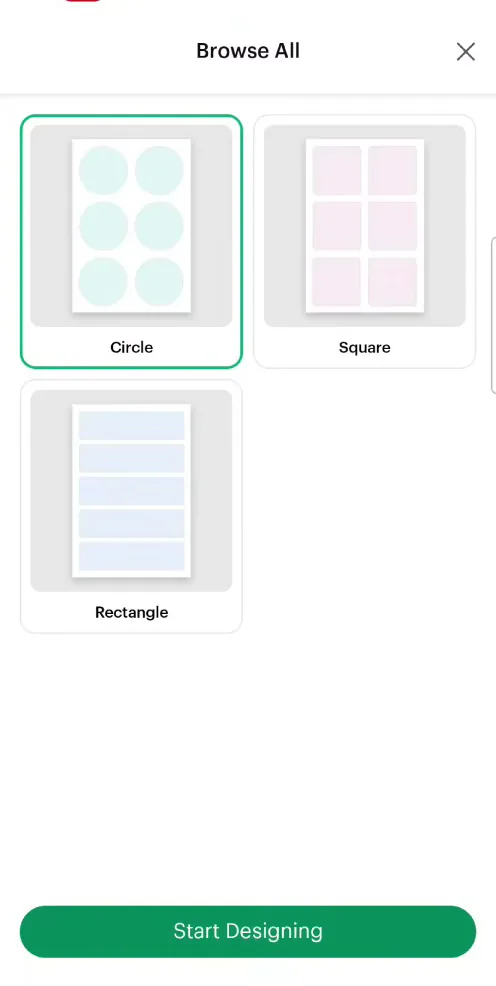
For my project I used one of the pre-cut circle sheets. Here's how it works:
- Pull the sticker sheet apart, fold it underneath, and add it to the tray. Pop the tray in and plug the machine in.
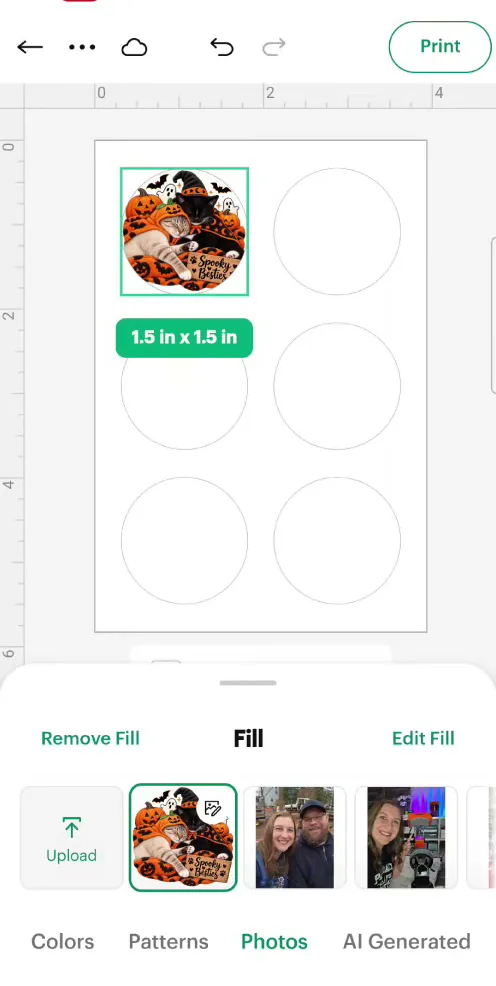
- In Design Space, tap Stickers and select the shape you're using.
- Browse the pre-made templates, or close them to open a blank template.
- Tap one of the circles, then Fill, Photos, Upload and Select from library. Tap a picture and press Done.
- Double tap the circle to adjust your picture, then tap Make to send it to the machine.
Tip: You can load several sheets of photo paper at once, but Cricut recommends loading sticker sheets one at a time for the best alignment.
It goes through the same printing and laminating process as the Print + Cut. There's just no cutting step, because the stickers are already cut. If you're happy using the pre-cut shapes, this may be all you need. When it's done, they pop right out and you can peel and stick them wherever your little heart desires.
Printing 4×6 Photos
Both machines also print regular 4×6 photos, so I sent one straight from my phone.
The photo paper has perforated tabs on the top and bottom. Once it's finished, you just snap those off and you have your 4×6 photo.
The print quality is amazing. They're vibrant and glossy, and they look like real photo prints you'd pick up from a store.
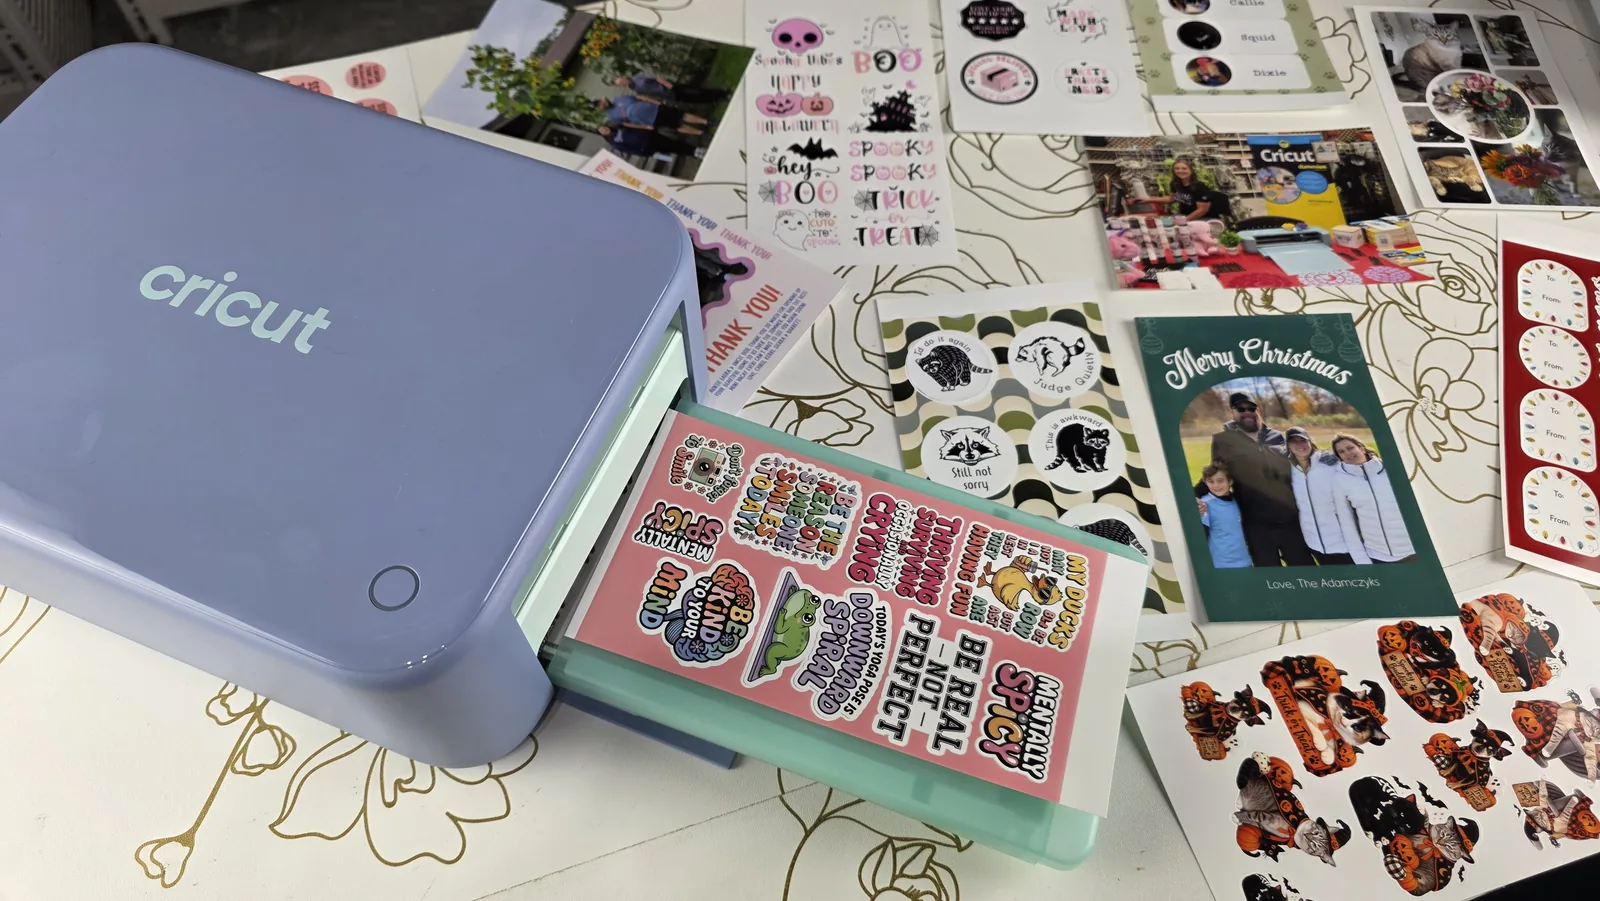
You can also use StickerPix for photo cards, invitations and labels. Design Space has templates for holiday cards, birthday invitations, labels and photo collages. So while stickers are the main attraction for me, that's not all these machines can do.
How Much Do StickerPix Refills Cost?
Here's what it actually costs to keep using these machines:
- StickerPix Print + Cut refill sets: $24.99 to $47.99, depending on the materials and bundle. The 36-print sticker sheet, photo paper and cartridge set is the one that matches what comes in the box.
- StickerPix Print refill sets: $27.99 to $32.99. The 54-print set matches the box contents.
- 72-print photo bundle: $37.99, about 53 cents per photo
When you break that down, you're looking at roughly 50 to 70 cents per sheet, and that includes the paper, the dye and the protective laminate. Honestly, that's better than I was expecting.
Photo prints do cost a little more at home. You can get a 4×6 for about 10 to 20 cents less at Walgreens or CVS. But then I have to actually GO to Walgreens or CVS, and I'd much rather print exactly what I want from my couch.
What I Love
- It's EASY. Especially the Print + Cut. I can do everything from my phone, I don't have to figure out material settings or do test cuts, and there's no sticky cutting mat.
- Automatic laminate. Applying laminate by hand is one of my least favorite parts of making stickers, and I don't have to do it anymore.
- It's tiny. I can use it right on my kitchen counter and put it away when I'm done.
- The photos look great. I have a gazillion pictures on my phone that I never print. Now if I want to give my father-in-law a picture of us standing in front of his sunflowers, I can print one in about two minutes.
- It makes me WANT to print things. Scrolling through the Design Space templates kept getting the gears turning about what else I could make. Maybe I'll actually send out Christmas cards this year.
What Could Be Better
- No true die-cut stickers. The Print + Cut doesn't cut all the way through the backing. If you sell individual stickers, you'd have to sell them as sheets or cut them apart afterward. (Not sure which you need? Here's my guide to kiss cut vs die cut stickers.) Honestly, I'm fine with that. Cutting all the way through would need a mat or some other way to keep pieces from falling into the machine, and no sticky mats is one of my favorite things about StickerPix.
- Small sheets only. You're limited to 4×6 or 4×7 inch sheets, so this isn't replacing your regular printer or your full-size Cricut.
- StickerPix materials only. The special coating means none of your existing sticker paper will work.
- One print uses a full panel of ribbon. Printing one small sticker costs the same as filling the sheet.
If Cricut ever makes a second version, I'd love to see a bigger model for things like 8×10 photos, bigger stickers, school pictures and posters. But for what this machine is meant to do, I honestly don't think I'd change much.
Who Should Buy a StickerPix (and Who Shouldn't)
The StickerPix is a great fit if you:
- Want stickers without printing, laminating and cutting on three separate machines
- Have a phone full of photos you never get around to printing
- Have kids who love stickers (my 11-year-old is going to love this thing)
- Are a teacher, a scrapbooker or a parent who wants personalized projects without a complicated crafting process
- Want to make quick photo cards, invitations and labels at home
My daughter came home last week with an assignment where she had to print a bunch of pictures and tape them all over her binder. I REALLY wish I'd had this then. She could have printed them as stickers and stuck them right on.
It's probably not for you if you:
- Sell individual die-cut stickers in volume
- Need prints bigger than 4×7 inches
- Want to use your own sticker paper or printable vinyl
StickerPix vs Other Ways to Make Stickers
I don't think StickerPix replaces your Cricut, your Silhouette or your regular printer. It's for the times you DON'T want to use all of those things. A full-size Cricut still cuts vinyl, iron-on, cardstock and a lot more. Here's everything a Cricut machine can do.
With a regular cutting machine, you make stickers with Print Then Cut. You design, print on a home inkjet, laminate by hand if you want them to last, put the sheet on a mat, and cut. It's more work, but you get full 8.5×11 sheets and true die-cuts.
You also get to pick your own paper. I tested five brands side by side in my sticker paper comparison if you want to see how they stack up. With StickerPix you skip that decision completely, because only StickerPix paper works.
StickerPix also isn't the first machine I've tried that prints and cuts in one place. I've made stickers with the xTool M2, which prints and then laser cuts them in the same machine, with no sticky mat and no registration marks. But if I just want to make some stickers quickly, the StickerPix is so much simpler and easier to use.
StickerPix trades all that flexibility for speed and convenience. Grab your phone, make something, hit go, and the machine does the rest.
FAQ
Does the Cricut StickerPix use ink?
Not liquid ink. It uses a cartridge with a ribbon of yellow, magenta and cyan dye that's heated onto the paper, plus a clear laminate layer. Each cartridge is sold with a matching number of sheets.
Can I use regular sticker paper in the Cricut StickerPix?
No. StickerPix paper has a special coating that the dye bonds to, so you have to use StickerPix materials. Your printable vinyl and inkjet sticker paper won't work.
Are Cricut StickerPix stickers waterproof?
Cricut calls them water-resistant, not waterproof. The automatic laminate protects against splashes, scratches and fading, but I wouldn't count on them surviving the dishwasher.
How much does it cost per sticker sheet?
About 50 to 70 cents per sheet, including the paper, dye and laminate. Print + Cut refill sets are $24.99 to $47.99 and StickerPix Print refills are $27.99 to $32.99.
Does the StickerPix need a cutting mat?
No. Neither machine uses a cutting mat, and the Print + Cut doesn't need registration marks either. The sheet moves straight from the printer into the built-in cutter.
Can the Cricut StickerPix make die-cut stickers?
No. The Print + Cut cuts around your designs but not through the backing, so you get a sticker sheet rather than individual die-cut stickers.
Can I use the StickerPix from my phone?
Yes. I set it up and made every project in this review from my phone using Cricut Design Space. You can use a computer too.
What's the difference between the StickerPix Print and Print + Cut?
The Print + Cut ($299) has a built-in cutter for custom sticker shapes and uses 4×7 inch sticker sheets. The Print ($169) has no cutter and uses pre-cut circle and rectangle sticker sheets. Both print 4×6 photos and laminate automatically.
Final Verdict: Which StickerPix Would I Buy?
Between the two, I'd personally choose the $299 StickerPix Print + Cut. If I'm buying something specifically to make stickers easier, I don't want to be stuck with pre-cut shapes.
But if you mostly want photos, cards, labels and simple pre-cut stickers, the $169 StickerPix Print may be all you need. You get the same printing and laminating without paying for a cutter you might not use.
Back in March I asked Cricut for something that could print and cut in one place. Six months later, here we are. What surprised me most is how much I genuinely love this machine. It's small, it's fast, it's ridiculously easy to use, and I have a feeling I'm going to use it a lot.
- Shop the Cricut StickerPix Print + Cut Essential Bundle
- Shop the Cricut StickerPix Print Essential Bundle
Which one would you choose? Would you save the $130, or pay extra for the built-in cutter? Let me know in the comments!