Hey Crafters! If you're someone who loves crafting and wants to get serious about budgeting, you’re in the right place.
Today, I’m going to walk you through how to make a personalized budget binder using vinyl and your Cricut machine. This project is not only fun and creative, but it also helps you stay organized and motivated as you manage your money.
In this guide, I’ll break down the process step-by-step, share some helpful tips, and even tell you a little story about how this budgeting method has helped people pay off thousands of dollars in debt. Plus, I’ll show you how you can make your own stickers and designs to really make your budget binder one-of-a-kind.

Table of Contents
- What Is a Budget Binder and Why Use One?
- Step 1: Gather Your Materials
- Step 2: Choose Your Design and Font
- Step 3: Design in Cricut Design Space
- Step 4: Cut Your Vinyl
- Step 5: Weed Your Vinyl Design
- Step 6: Prepare Your Binder Surface
- Step 7: Apply Transfer Tape and Vinyl
- Step 8: Enjoy Your Personalized Budget Binder!
- Why Use Cash Stuffing and Budget Binders?
- Turning Budget Binders into a Business
- Tips for Vinyl and Cricut Beginners
- Frequently Asked Questions (FAQ)
- Final Thoughts
What Is a Budget Binder and Why Use One?
You might be wondering, “What exactly is a budget binder?” Simply put, it’s a small binder filled with envelopes that you can stuff with cash. This method is called cash stuffing and it’s a popular way to keep your spending in check.
Here’s how it works: You start by setting a budget and dividing your money into categories, like groceries, bills, utilities, and more. Each category gets its own envelope. Then, you withdraw the cash for each category and physically place it into the envelopes. This way, you can easily see how much money you have left in each category and avoid overspending.

This simple technique has helped many people pay off tens of thousands of dollars in debt. One great example is Jasmine Taylor, who used cash stuffing to pay off nearly $80,000 in credit card and student loan debt. She even turned her budgeting journey into a successful business, making nearly a million dollars a year by sharing tutorials and selling supplies related to cash stuffing.
Step 1: Gather Your Materials
Before we start personalizing, you’ll need to gather a few materials. Here’s what you’ll need for this project:
- A Cricut machine: Any Cricut machine will work, including the Cricut Joy, Explore Air 2, Explore 3, Maker, or Maker 3. You can also use other vinyl cutting machines like the Silhouette Cameo.
- Permanent vinyl: I recommend Oracle 651 vinyl because it’s durable and sticks well. For this project, I used rainbow vinyl from the Dollar Tree to add a fun, colorful touch.
- Transfer tape: This helps you move your vinyl design from its backing to the binder smoothly. I use a high-quality transfer tape that I’ve found works best and lasts a long time.
- Budget binder: You can find budget binders on Amazon or other stores. They usually have envelopes and sections for organizing your cash.
- Basic crafting tools: This includes a ruler, scissors, a weeding tool (to remove extra vinyl), a scraper (to smooth your vinyl), and a vinyl trimmer or scissors for cutting vinyl.
To help you find these materials, I’ll leave some links below where you can purchase everything you need.

Step 2: Choose Your Design and Font
Now that you have your materials, the next step is to decide what you want to put on your binder. You can personalize it with a name, a motivational phrase, or anything that makes you excited to use it.
For fonts, I like to use thicker fonts because they stick better to surfaces and are less likely to peel off over time. For this project, I used a font called Thick Font from Creative Fabrica, which has a cute, bold look perfect for vinyl projects.
If you want to explore fonts yourself, Creative Fabrica offers an all-access subscription with unlimited downloads, and you can even try it free for a month. This way, you can find the perfect font to match your style.

Step 3: Design in Cricut Design Space

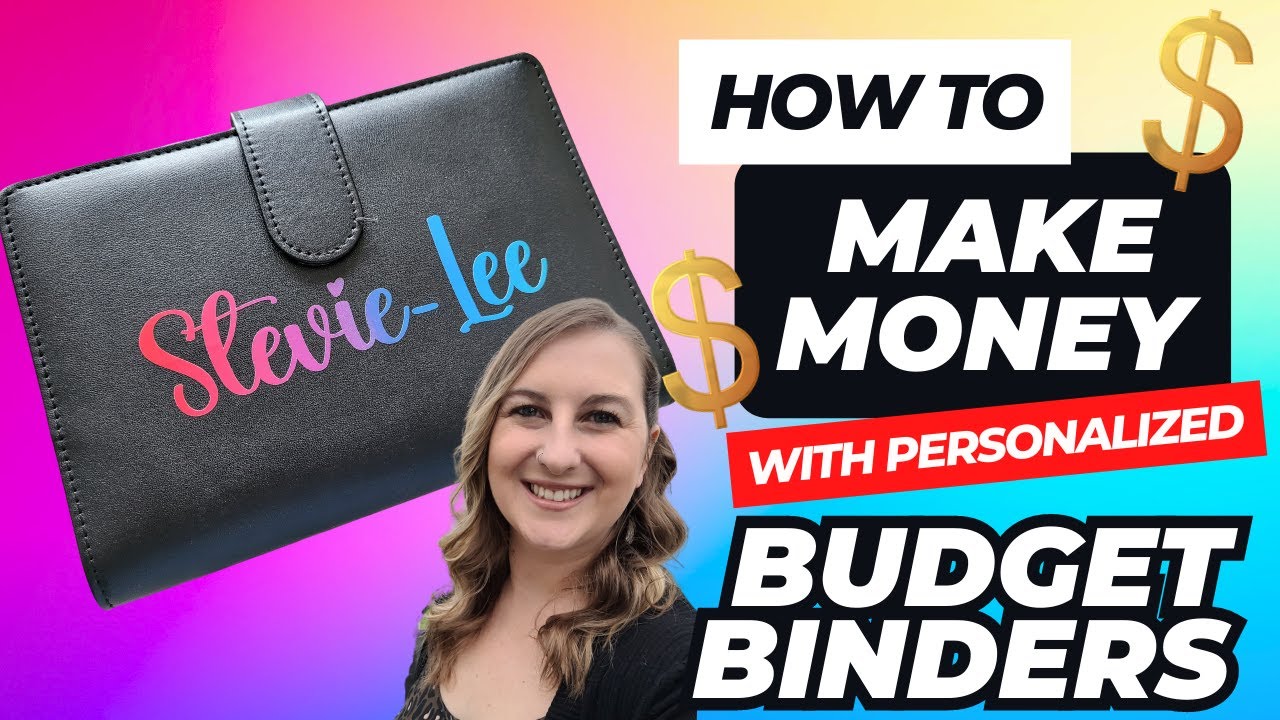
Open Cricut Design Space and start your project by clicking on the “Text” tool. Type out the name or message you want on your budget binder. For example, I personalized my friend’s binder with her name, “Stevie Lee.”
Once you’ve typed your text, you can resize it to fit your binder. The binder I used is about 7 inches wide, so I made my design about 5 inches wide to leave some space on each side.

Use the resize handles in Cricut Design Space to adjust the size, and when you’re happy with it, click “Make It” to prepare for cutting.
Step 4: Cut Your Vinyl

Before cutting, trim your vinyl to the size you need. I usually cut about two inches wide, which is enough for my design. You can use a Cricut trimmer if you have one, or just scissors.
Place your vinyl color side up on your cutting mat. If you’re using permanent vinyl like Oracle 651, select the “Vinyl” setting on your Cricut. But if you’re using a thinner or less durable vinyl like Dollar Tree vinyl, I recommend using the “Washi” setting with some pressure adjustments to avoid cutting too deeply.

Once your settings are ready, load your mat into the machine and start cutting.
Step 5: Weed Your Vinyl Design
After your Cricut finishes cutting, unload the mat and start weeding. Weeding means removing all the extra vinyl that you don’t want to stick to your binder.
Use a weeding tool or a pair of tweezers to carefully pick out the small pieces from your design, leaving only the letters or shapes you want to apply.

Step 6: Prepare Your Binder Surface
Usually, it’s a good idea to clean the surface where you’ll apply vinyl to remove oils and dirt. For most projects, I use isopropyl alcohol to wipe the surface first.
However, if your budget binder is made from leather or a similar material, be careful. Alcohol or harsh cleaners can damage leather. For this project, I skipped cleaning to avoid ruining the cover, and the vinyl still stuck well.
If your binder is dirty, you can gently wipe it with a damp coffee filter or cloth before applying vinyl.
Step 7: Apply Transfer Tape and Vinyl
Cut a piece of transfer tape about the same size as your design. Place it sticky side down on top of your weeded vinyl design. Use a scraper tool or your fingers to firmly press the transfer tape onto the vinyl.
Now, slowly peel the backing paper off the vinyl. Your vinyl should stick to the transfer tape and lift away from the backing.
If your transfer tape isn’t very sticky and the vinyl doesn’t stick well, try flipping the tape over and peeling the backing off from the other side. But with good quality transfer tape, this usually isn’t necessary.
Next, carefully place the transfer tape with vinyl onto your binder. Smooth it down well with your scraper tool to make sure it sticks.
Finally, peel the transfer tape back slowly, leaving your vinyl design perfectly applied to the binder.

Step 8: Enjoy Your Personalized Budget Binder!
And just like that, you have a beautiful, personalized budget binder! I was really impressed with how the rainbow vinyl from Dollar Tree held up. It’s colorful, shiny, and looks great.
This budget binder will help you stay on track with your cash stuffing method and keep your finances organized in a stylish way.

Why Use Cash Stuffing and Budget Binders?
Cash stuffing is more than just a budgeting method—it’s a way to be intentional with your money. When you use cash, you can physically see how much you’re spending and how much you have left. This makes it easier to avoid impulse purchases and stick to your budget.
For example, Jasmine Taylor, a woman from Texas, once struggled with nearly $80,000 in debt. She started cash stuffing, tracked every dollar, and gradually paid off most of her debt. Her journey inspired many, and she turned it into a thriving business teaching others how to budget this way.
Using a budget binder makes this process simple and organized. You can label each envelope for different spending categories like groceries, bills, or entertainment. When the cash runs out in an envelope, you know you’ve hit your limit for that category.
Turning Budget Binders into a Business
Cash stuffing has become so popular that many people are selling personalized budget binders online. For example, on Etsy, you’ll find top sellers offering beautifully customized budget binders for around $19 to $24. Some sellers focus exclusively on budget binders and related products like labels and printables.
Digital files like SVG designs are also a great way to make money without worrying about shipping or inventory. Every time someone downloads your digital file, you earn money.
When pricing your products, a good rule of thumb is to charge at least three times the cost of your materials. For example, if your blank budget binder costs around $7, you’d want to price your finished product at least $21 to make a good profit.
Another option is to sell locally. This can help you avoid shipping hassles and often allows for higher prices since you’re not competing with tons of online sellers.
Tips for Vinyl and Cricut Beginners
- Choose thicker fonts: Thicker fonts stick better and last longer, especially on items like binders or glassware that get handled often.
- Use good quality vinyl: Oracle 651 is a favorite for permanent vinyl projects. It’s durable and easy to work with.
- Adjust your Cricut settings: Different vinyl types may need different cut settings. For thinner vinyl like Dollar Tree’s, use the “Washi” setting with reduced pressure.
- Reuse transfer tape: Good transfer tape can be reused many times, so don’t throw it away after one use.
- Clean your surface when possible: Clean surfaces help vinyl stick better, but be cautious with delicate materials like leather.
Frequently Asked Questions (FAQ)
What is cash stuffing and why is it effective?
Cash stuffing is a budgeting method where you allocate cash into envelopes for different spending categories. It’s effective because physically handling cash makes you more aware of your spending limits, helping you avoid overspending and stay on track.
Can I personalize budget binders without a Cricut machine?
Yes! While a Cricut makes vinyl cutting easy and precise, you can also use stickers, stamps, or hand-lettering to personalize your binder.
What type of vinyl should I use for budget binders?
Permanent vinyl like Oracle 651 is recommended because it’s durable and sticks well to most surfaces. Avoid using cheaper vinyl for items you want to last a long time.
How do I clean the surface before applying vinyl?
For most surfaces, use isopropyl alcohol to wipe away oils and dirt. For delicate materials like leather, use a damp cloth or coffee filter with water to avoid damage.
Can I sell personalized budget binders online?
Absolutely! Many people sell customized budget binders on platforms like Etsy. Just consider material costs, shipping, and pricing to ensure a profit.
Are digital files a good way to make money?
Yes! Selling digital designs like SVG files means you don’t have to deal with physical products, packaging, or shipping. You earn money every time someone downloads your design.
Final Thoughts
Personalizing budget binders with vinyl and a Cricut machine is a fun and practical way to stay motivated while managing your money. This project is perfect for beginners and experienced crafters alike. Plus, the cash stuffing method can truly change how you handle your finances, helping you save money and pay off debt.
Whether you want to create a beautiful binder for yourself or start a small business selling customized budget binders, this tutorial gives you the tools and confidence to get started.
Remember, budgeting doesn’t have to be boring. Add your own style and creativity to make the process enjoyable and inspiring. Happy crafting and happy budgeting!