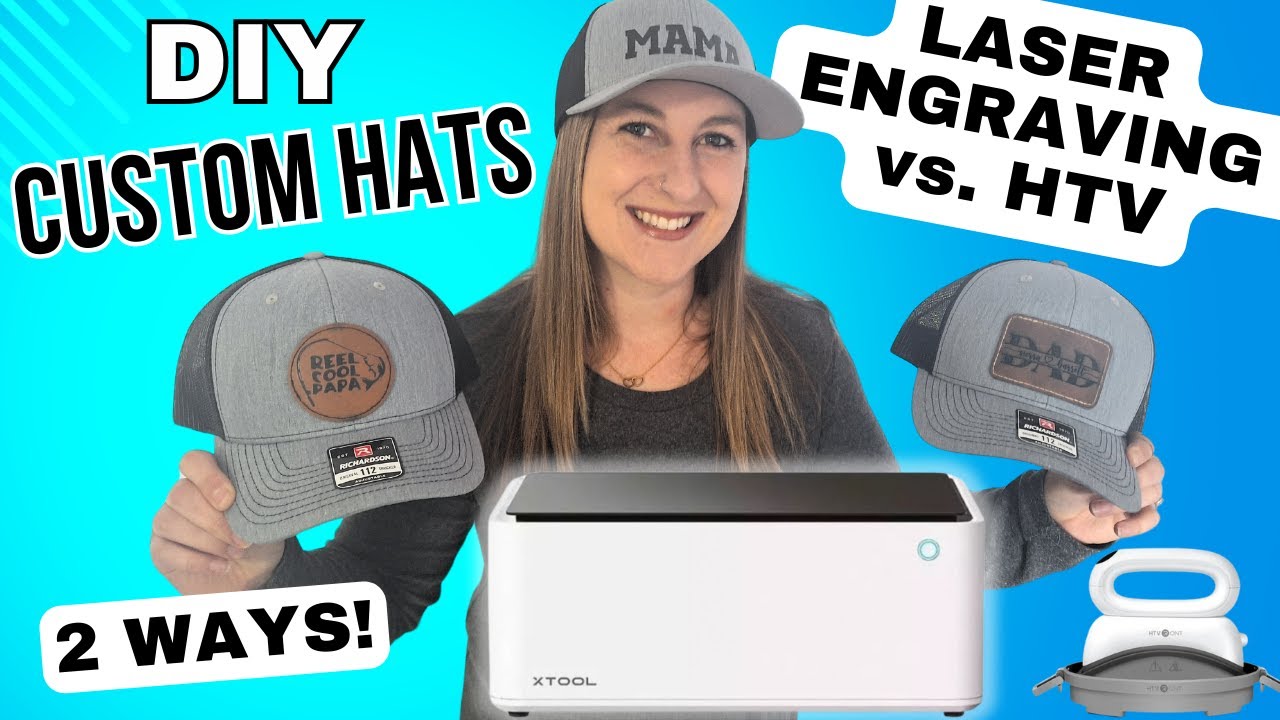
Hey there! If you love custom hats and want to learn how to make some awesome leather patch hats, you're in the right place. Today, I’m sharing two fun and creative ways to make custom hats using leather patches. Whether you want to try heat transfer vinyl (HTV) or laser engraving, I’ll walk you through everything step-by-step. Plus, I’ll show you how to use the amazing xTool M1—a cool two-in-one machine that does both vinyl cutting and laser engraving.

Custom hats are perfect gifts for friends and family or even cool items to sell if you have a small business. So, let’s dive in and get crafting!
Table of Contents
- Step 1: Gather Your Materials
- Step 2: Download Your Designs and Fonts
- Step 3: Prepare Your Design for Laser Engraving
- Step 4: Set Up the Leather Patch for Laser Engraving
- Step 5: Laser Engrave Your Leather Patch
- Step 6: Prepare Your Design for Heat Transfer Vinyl (HTV)
- Step 7: Cut and Weed Your Heat Transfer Vinyl Design
- Step 8: Heat Press Your Leather Patch Hats
- Step 9: Admire Your Custom Leather Patch Hats!
- Frequently Asked Questions (FAQ)
- Final Thoughts
Step 1: Gather Your Materials
Before we start, you’ll want to have all your materials ready. Here’s what you’ll need for both methods:
- Vinyl cutting machine or laser engraver: The xTool M1 is perfect because it does both! If you only have a Cricut, that works great too.
- Heat transfer vinyl (HTV): I like to use black Siser EasyWeed HTV—it’s easy to work with and looks great.
- Blank hats: I’m using Richardson Original 112 trucker adjustable hats from Amazon. They have a nice shape and adjustable fit.
- Leather patches: I bought both round and rectangular ones from Amazon. Some designs look better on round patches, others on rectangular, so it’s nice to have both options.
- Hat heat press: I’m using the HTVRont Hat Heat Press. It has a curved shape that fits hats perfectly and makes heat pressing easy.
- Thermal tape: This helps hold your design or patch in place during pressing or laser engraving.
- Standard grip mat: For sticking your vinyl on during cutting.
- Trimmer or scissors: To cut your vinyl.
- Weeding tools: To remove excess vinyl after cutting.
- Computer with design software: To create and edit your designs.
One important tip: always mirror your image when working with HTV. This makes sure your design looks right when pressed on the hat.

Step 2: Download Your Designs and Fonts
Next, we’ll pick out the designs and fonts to use on our hats. I get mine from Creative Fabrica, which has tons of great fonts and SVG files. For this project, I’m using two main designs:
- Dad Split SVG: A stylish “Dad” design perfect for rectangular patches.
- Reel Cool Papa SVG: A fun round design great for circular patches.
For fonts, I love the Hello Honey font family. It has cute swashes and hearts that add a personal touch, especially when adding names or special words.
If you want to try Creative Fabrica, they offer a free trial, and I’ll share links below where you can sign up.

Step 3: Prepare Your Design for Laser Engraving
Let’s start with the laser engraving method for the leather patch. Here’s how I put it all together:
- Open the xTool software on your computer.
- Drag and drop your “Dad Split SVG” file into the software or use the image upload button.
- Type out names or words you want to include using the Hello Honey font family. For example, I typed my children’s names with different font styles to add flair.
- Use the weld feature to join letters together so there are no gaps or slice marks between letters.
- Combine and unite all text and design elements into one piece.
- Resize and position your design to fit nicely on the leather patch.
This step is important because laser engraving requires precise placement and sizing to look great on the leather.

Step 4: Set Up the Leather Patch for Laser Engraving
Now it’s time to prepare the leather patch for engraving:
- Turn on your xTool M1 laser engraver and open the lid.
- Place the leather patch inside the machine. It’s important that the patch lies flat to get a clean engraving.
- Use thermal tape to tape down the edges of the patch so it doesn’t move or curl up.
- Close the lid carefully.
- Refresh the camera view in the software to see the patch and adjust your design’s position if needed.
- Use the machine’s thickness measuring tool to get the right settings for engraving leather.
Sometimes the patch doesn’t lay perfectly flat, but the camera helps you spot that so you can fix it before engraving.

Step 5: Laser Engrave Your Leather Patch
Now that everything is set, you’ll adjust the engraving settings:
- Set the power to 80% for a deep enough engraving.
- Set the speed to 100 to balance detail and speed.
- Set the lines per centimeter to 180 for fine detail.
Once your machine is ready, hit the start button and watch the magic happen!
After engraving, you might notice some smoke marks around your design. Don’t worry! You can gently wipe the patch with a bit of vinegar on a paper towel to remove the smokiness and brighten the leather.

Step 6: Prepare Your Design for Heat Transfer Vinyl (HTV)
Now let’s switch gears and make the second hat using heat transfer vinyl on a leather patch.
- Download the SVG file you want to use (I’m using the “Reel Cool Papa” design).
- Place your leather patch in the machine and refresh the camera view to check the size.
- Upload your design into the xTool software and resize it to fit the patch.
- Important: Mirror your design horizontally because HTV needs to be flipped before pressing.
- Cut a piece of HTV vinyl slightly larger than your patch to make sure it fully covers the design.
This step prepares your design and vinyl for cutting and pressing.

Step 7: Cut and Weed Your Heat Transfer Vinyl Design
Next, we’ll cut out the vinyl and get it ready for pressing:
- Place your HTV vinyl shiny side down on the standard grip mat.
- Remove the protective backing from the sticky side of the vinyl.
- Load the mat into your xTool M1 or vinyl cutter.
- Make sure the software is set to blade cut mode, not laser.
- Select the material type as PU HTV vinyl for the right cutting settings.
- Start the cutting process.
- Once cut, use your weeding tools to remove the extra vinyl, leaving only your design on the carrier sheet.
Weeding is a fun step where you reveal your design by peeling away the vinyl you don’t need.

Step 8: Heat Press Your Leather Patch Hats
Now for the exciting part—pressing your patches onto the hats! Here’s how I do it with the HTVRont Hat Heat Press:
- Turn on your hat heat press and set the temperature to 315°F.
- Set the timer for 60 seconds.
- Place your hat on the curved mold with the front facing up.
- Position the leather patch with the design on the hat where you want it.
- Use thermal tape to hold the patch in place so it doesn’t move during pressing.
- Put the heat press on top, close the tabs, and start the timer.
- When the timer ends, carefully remove the press and let the hat cool for a bit.
Repeat these steps for both the laser engraved patch and the HTV patch. The heat press makes it super easy to get a smooth, professional finish on curved hats.

Step 9: Admire Your Custom Leather Patch Hats!
And just like that, you have two amazing custom hats—one with a laser engraved leather patch, and the other with an HTV design pressed onto a leather patch. Both came out beautifully and show how versatile the xTool M1 machine is.
Personally, I love the laser engraving method because it’s simpler and requires fewer materials. You just pop the patch in, press start, and you’re done! HTV is great too, but it has extra steps like cutting, weeding, and requires buying vinyl and mats.
I can’t wait to gift the “Real Cool Papa” hat to my stepdad for his birthday, and my husband already loves his new “Dad” hat. These make perfect personalized gifts or products to sell in your craft business.

Frequently Asked Questions (FAQ)
Can I make leather patch hats without a laser engraver?
Yes! You can use a vinyl cutting machine like a Cricut to cut heat transfer vinyl and press it onto leather patches. Just make sure to mirror your design before cutting.
What kind of leather patches work best?
Both round and rectangular patches work well. Choose the shape that fits your design best. Round patches look great for circular or logo designs, while rectangular patches fit text or split designs nicely.
Do I need special settings for laser engraving leather?
Yes, leather isn’t a preset material on most machines, so you’ll want to do a custom setting. I recommend power around 80%, speed about 100, and lines per centimeter at 180 for a clear engraving.
How do I remove smoke marks after laser engraving?
Use a little vinegar on a paper towel and gently rub the leather patch. This helps remove the smoky residue and brightens the design.
What temperature and time should I use for heat pressing leather patches?
Set your heat press to about 315°F and press for 60 seconds. Use thermal tape to keep your patch in place while pressing.
Can I use the xTool M1 for both cutting vinyl and laser engraving?
Absolutely! The xTool M1 is a hybrid machine that does both vinyl cutting and laser engraving, making it perfect for projects like these.
Final Thoughts
Making custom leather patch hats is a fun and rewarding project. Whether you choose laser engraving or heat transfer vinyl, both methods allow you to create unique, personalized hats that stand out. The xTool M1 makes it easy to switch between these techniques, saving time and space in your crafting setup.
Remember to gather all your materials, plan your designs carefully, and take your time with each step. Don’t forget to mirror your HTV designs and use thermal tape for a smooth pressing experience.
Happy crafting, and enjoy making hats that your friends and family will love!
For more great crafting ideas and tutorials, be sure to check out all the links and resources mentioned throughout this guide.